Sharp DK-AP8P DK-AP8P Operation Manual - Page 7

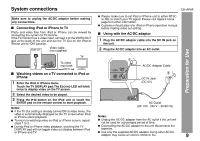
Controls and indicators - review

Page 7 highlights

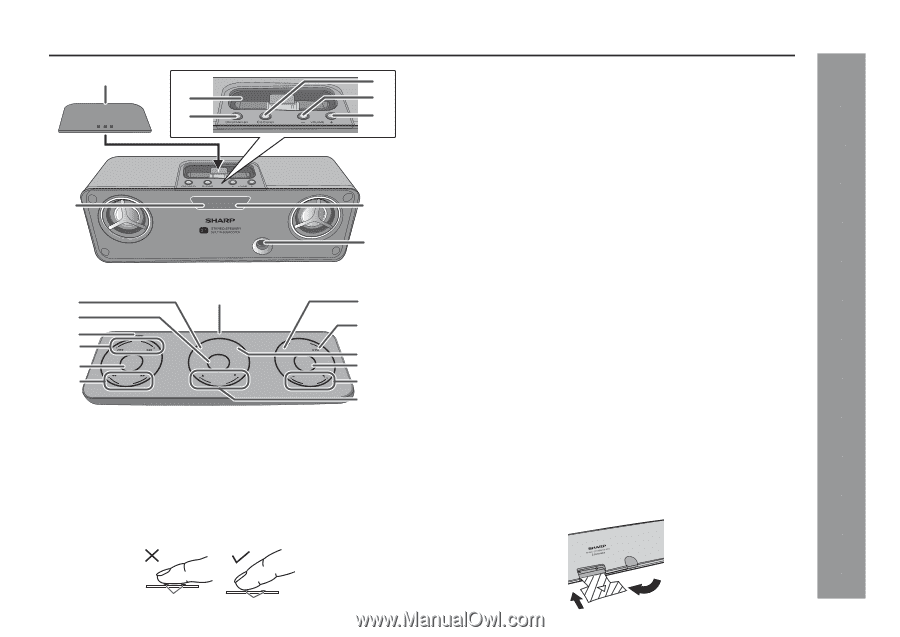
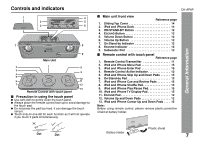
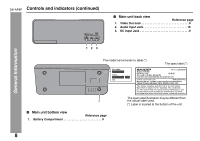
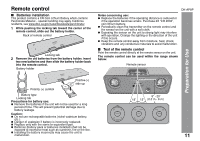
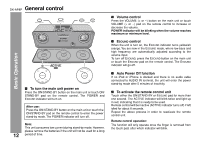
Controls and indicators 1 4 2 5 3 6 7 ON/STAND-BY ESOUND 8 9 Main Unit 2 3 4 5 SKIP 6 ON/STAND-BY 7 CUE/ REVIEW 1 MENU TV DISPLAY ENTER CURSOR PLAY MODE SHUFFLE ESOUND VOLUME 8 9 10 11 12 13 Remote Control with touch panel ■ Precaution in using the touch panel ● Use soft cloth to gently clean the touch panel. ● Always place the remote control face up to avoid damage to the touch pad. ● Do not press the pad too hard, it can damage the touch sensor. ● Touch only on one dot for each function as it will not operate if you touch 2 pads simultaneously. DK-AP8P General Information ■ Main unit front view Reference page 1. Sliding Top Cover 14 2. iPod and iPhone Dock 14 3. ON/STAND-BY Button 12 4. ESOUND Button 12 5. Volume Down Button 12 6. Volume Up Button 12 7. On/Stand-by Indicator 12 8. ESOUND Indicator 12 9. Subwoofer Port 12 ■ Remote control with touch panel Reference page 1. Remote Control Transmitter 11 2. iPod and iPhone Menu Pad 15 3. iPod and iPhone Enter Pad 15 4. Remote Control Active Indicator 12 5. iPod and iPhone Skip Up and Down Pads 15 6. On/Stand-by Pad 12 7. iPod and iPhone Cue and Review Pads 15 8. iPod and iPhone Shuffle Pad 15 9. iPod and iPhone Play/Pause Pad 15 10. iPod and iPhone TV Display Pad 15 11. ESOUND Pad 12 12. Volume Up and Down Pads 12 13. iPod and iPhone Cursor Up and Down Pads . . . . 15 Note: Before using remote control, please remove plastic protective shield at battery holder. Dot Dot Battery holder Plastic shield 7

  • 1
  • 2
  • 3
  • 4
  • 5
  • 6
  • 7
  • 8
  • 9
  • 10
  • 11
  • 12
  • 13
  • 14
  • 15
  • 16
  • 17
  • 18
  • 19
  • 20

7
DK-AP8P
General Information
Controls and indicators
Precaution in using the touch panel
Use soft cloth to gently clean the touch panel.
Always place the remote control face up to avoid damage to
the touch pad.
Do not press the pad too hard, it can damage the touch
sensor.
Touch only on one dot for each function as it will not operate
if you touch 2 pads simultaneously.
Main unit front view
Reference page
1.
Sliding Top Cover . . . . . . . . . . . . . . . . . . . . . . . . . . 14
2.
iPod and iPhone Dock . . . . . . . . . . . . . . . . . . . . . . 14
3.
ON/STAND-BY Button . . . . . . . . . . . . . . . . . . . . . . 12
4.
E
SOUND
Button . . . . . . . . . . . . . . . . . . . . . . . . . . . . 12
5.
Volume Down Button . . . . . . . . . . . . . . . . . . . . . . . 12
6.
Volume Up Button
. . . . . . . . . . . . . . . . . . . . . . . . . 12
7.
On/Stand-by Indicator . . . . . . . . . . . . . . . . . . . . . . 12
8.
E
SOUND
Indicator
. . . . . . . . . . . . . . . . . . . . . . . . . . 12
9.
Subwoofer Port
. . . . . . . . . . . . . . . . . . . . . . . . . . . 12
Remote control with touch panel
Reference page
1.
Remote Control Transmitter
. . . . . . . . . . . . . . . . . 11
2.
iPod and iPhone Menu Pad . . . . . . . . . . . . . . . . . . 15
3.
iPod and iPhone Enter Pad . . . . . . . . . . . . . . . . . . 15
4.
Remote Control Active Indicator. . . . . . . . . . . . . . 12
5.
iPod and iPhone Skip Up and Down Pads . . . . . . 15
6.
On/Stand-by Pad. . . . . . . . . . . . . . . . . . . . . . . . . . . 12
7.
iPod and iPhone Cue and Review Pads . . . . . . . . 15
8.
iPod and iPhone Shuffle Pad. . . . . . . . . . . . . . . . . 15
9.
iPod and iPhone Play/Pause Pad. . . . . . . . . . . . . . 15
10.
iPod and iPhone TV Display Pad . . . . . . . . . . . . . . 15
11. E
SOUND
Pad. . . . . . . . . . . . . . . . . . . . . . . . . . . . . . . 12
12.
Volume Up and Down Pads . . . . . . . . . . . . . . . . . . 12
13.
iPod and iPhone Cursor Up and Down Pads . . . . 15
Note:
Before using remote control, please remove plastic protective
shield at battery holder.
ON/STAND-BY
E
SOUND
3
2
1
7
9
8
5
6
4
Main Unit
C
U
R
S
O
R
ENTER
MENU
TV DI
S
PLAY
R
E
V
I
E
W
C
U
E
/
S
K
I
P
ON/
S
TAND-B
Y
V
O
L
U
M
E
P
L
A
Y
M
O
D
E
E
S
O
U
N
D
S
HU
F
F
L
E
6
5
4
2
3
7
1
11
10
8
9
12
1
3
Remote Control with touch panel
Dot
Dot
Battery holder
Plastic shield