Sharp DV-RW350U Operation Manual - Page 10
Using a remote control
 |
View all Sharp DV-RW350U manuals
Add to My Manuals
Save this manual to your list of manuals |
Page 10 highlights
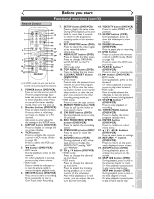
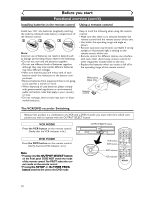
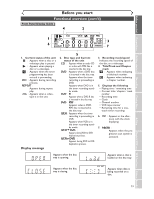
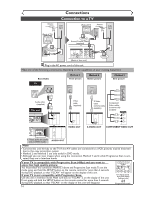
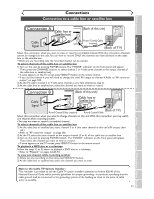
Before you start Functional overview (cont'd) Installing batteries in the remote control Using a remote control Install two "AA" size batteries (supplied) matching the polarity indicated inside battery compartment of the remote control. 1 2 3 Note: Incorrect use of batteries can result in hazards such as leakage and bursting. Please observe the following: • Do not mix new and old batteries together. • Do not use different kinds of batteries together, although they may look similar, different batteries may have different voltages. • Make sure that the plus and minus ends of each battery match the indications in the battery compartment. • Remove batteries from equipment that is not going to be used for a month or more. • When disposing of used batteries, please comply with governmental regulations or environmental public instruction rules that apply in your country or area. • Do not recharge, short-circuit, heat, burn or disassemble batteries. Keep in mind the following when using the remote control: • Make sure that there is no obstacle between the remote control and the remote sensor of the unit. • Use within the operating range and angle as shown. • Remote operation may become unreliable if strong sunlight or fluorescent light is shining on the remote sensor of the unit. • Remote control for different devices can interfere with each other. Avoid using remote control for other equipment located close to the unit. • Replace the batteries when you notice a fall off in the operating range of the remote control. Within about 23feet (7m) Remote control REC hREV kPAUSE H P OTROIGPINMAELNU/ CSTOP PLABY gFWD ENTER K PLAYMLEINSUT SKIP G 60˚ POWER STOP/EJECT REW F.FWD PLAY REC/OTR OPEN/CLOSE (CTHRAACNKNINEGL) DUBBING VCR DVD OUTPUT SELECT STOP PLAY REC/OTR The VCR/DVD recorder Switching Because this product is a combination of a VCR and a DVD recorder, you must select first which component you wish to operate with the OUTPUT SELECT button. VCR MODE Press the VCR button on the remote control. (Verify that the VCR indicator is lit.) DVD MODE Press the DVD button on the remote control. (Verify that the DVD indicator is lit.) Note • Pressing only the OUTPUT SELECT button on the front panel DOES NOT switch the mode of the remote control.You MUST select the correct mode on the remote control. • Pressing the SETUP or the TIMER PROG. button switches the unit to the DVD mode. OUTPUT SELECT button OPEN/CLOSE POWER STOP/EJECT PLAY REW F.FWD REC/OTR VCR VCR DVD CHANNEL (TRACKING) DUBBING OUTPUT SELECT STOP PLAY REC/OTR VCR button DVD button DVD POWER REC MODE REC SPEED AUDIO OPEN/CLOSE .@/: 1 GHI 4 PQRS 7 DISPLAY ABC 2 JKL 5 TUV 8 SPACE 0 VCR DEF 3 MNO CH 6 WXYZ VIDEO/TV 9 SLOW DVD PAUSE PLAY STOP DVD indicator REC/OTR SETUP TIMER PROG. REC MONITOR ENTER OUTPUT SELECT MENU/LIST TOP MENU RETURN VCR indicator CLEAR/C.RESET ZOOM SKIP SEARCH MODE CM SKIP SKIP DVD/VCR RECORDER 10
-
 1
1 -
2
-
3
-
4
-
 5
5 -
 6
6 -
 7
7 -
 8
8 -
 9
9 -
 10
10 -
 11
11 -
 12
12 -
 13
13 -
 14
14 -
 15
15 -
16
-
17
-
18
-
19
-
20
-
21
-
22
-
23
-
24
-
25
-
26
-
27
-
28
-
29
-
30
-
31
-
32
-
33
-
34
-
35
-
36
-
37
-
38
-
39
-
40
-
41
-
42
-
43
-
44
-
45
-
46
-
47
-
48
-
49
-
50
-
51
-
52
-
53
-
54
-
55
-
56
-
57
-
58
-
59
-
60
-
61
-
62
-
63
-
64
-
65
-
66
-
67
-
68
-
69
-
70
-
71
-
72
-
73
-
74
-
75
-
76
-
77
-
78
-
79
-
80
-
81
-
82
-
83
-
84
-
85
-
86
-
87
-
88
-
89
-
90
-
91
-
92
-
93
-
94
-
95
-
96
-
97
-
98
-
99
-
100
-
101
-
102
-
103
-
104
-
105
-
106
-
107
-
108
-
109
-
110
-
111
-
112
 |
 |
