Sharp XL-HP500 Service Manual - Page 8
Xl-hp500, Cd Mechanism
 |
View all Sharp XL-HP500 manuals
Add to My Manuals
Save this manual to your list of manuals |
Page 8 highlights
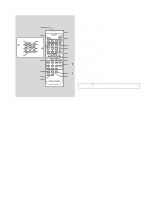
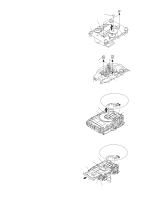
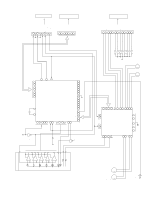
XL-HP500 CD MECHANISM SECTION Perform steps 1 to 4 and 11 to 12 of the disassembly method to remove the CD mechanism. How to remove the Optical Pickup (See Fig. 8-1) 1. Remove the screws (A1) x 2 pcs and shaft (A2) x 1 pc. 2. Remove the stop washer (A3) x 1 pc and gear (A4) x 1 pc. 3. Remove the optical pickup. Note: After pulling out the optical pickup connector, wrap the tip of it with conductive aluminium foil or the like to protect the optical pickup from the static electricity. How to remove the Tray Motor and the Main Cam Motor (See Fig. 8-2) 1. Remove the CD changer mechanism unit by the method described in page 7, and disassemble as shown in the figure. 2. Remove the belt (B1) x 2 pcs from the motor side. 3. Remove the screws (B2) x 4 pcs. 4. Remove the tray motor and the main cam motor. How to remove the CD Disc (When CD is in the playback state) (See Fig. 8-3) 1. Remove the cabinet and front panel. 2. Disassemble as shown in the figure so that the CD disc of CD changer becomes visible. 3. Remove the CD disc as shown in the figure. Stop Washer (A3) x1 Optical Pickup CD Mechanism (A1) x2 ø2.6 x5mm Shaft Gear (A2) x1 (A4) x1 Figure 8-1 (B2) x2 ø2.6 x4mm (B2) x2 ø2.6 x4mm Belt (B1) x1 Belt (B1) x1 Main Cam Motor Tray Motor Figure 8-2 Disk Holder CD Disk Turn the main cam clockwise and raise the CD mechanism and disk holder up to the uppermost position. CD Changer Mechanism Unit How to remove the CD Disc (When CD exists in the tray) (See Fig. 8-4) 1. Remove the cabinet and front panel. 2. Disassemble as shown in the figure so that the CD disc of CD changer can be taken out. 3. Remove the CD disc from the tray as shown in the figure. (When CD is in playback state) Figure 8-3 Disc Holder CD Mechanism CD Disk Turn the main cam clockwise and raise the CD mechanism and disk holder up to the uppermost position. CD Changer Mechanism unit - 8 - Disk Tray 1 1 Press in turns the arrow 2 parts, starting with the uppermost one, to 3 withdraw the disc trays Disk Tray 2 Disk Tray 3 (When CD exists in the tray) Figure 8-4
-
 1
1 -
2
-
 3
3 -
 4
4 -
 5
5 -
 6
6 -
 7
7 -
 8
8 -
 9
9 -
 10
10 -
 11
11 -
 12
12 -
 13
13 -
14
-
15
-
16
-
17
-
18
-
19
-
20
-
21
-
22
-
23
-
24
-
25
-
26
-
27
-
28
-
29
-
30
-
31
-
32
-
33
-
34
-
35
-
36
-
37
-
38
-
39
-
40
-
41
-
42
-
43
-
44
-
45
-
46
-
47
-
48
-
49
-
50
-
51
-
52
-
53
-
54
-
55
-
56
-
57
-
58
-
59
-
60
 |
 |
