Sharp XR-1XDM XR-1S , XR-1X Operation Manual - Page 21
Adjust the projected image with the Setup Guide, Select the INPUT mode, Turn the Power off
 |
View all Sharp XR-1XDM manuals
Add to My Manuals
Save this manual to your list of manuals |
Page 21 highlights
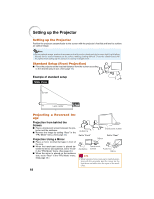
Quick Start 4. Adjust the projected image with the Setup Guide 1 After the projector turns on, the Setup Guide appears. (When "Setup Guide" is set to "On". n page 45) 3 Angle (See page 28.) • Adjust the projector angle using the HEIGHT ADJUST button. • Refer to the Setup Guide screen to adjust the focus, angle and zoom. • Press TENTER to finish the Setup Guide. 2 Focus (See page 27.) • Bring the projected image into focus using the focus ring. Focus ring HEIGHT ADJUST button 4 Zoom (See page 28.) • Adjust the projected image size using the zoom knob. Zoom knob zoom in zoom out 5 After adjusting the focus, height and screen size, press TENTER to finish the Setup Guide. _P. 27 5. Select the INPUT mode Select the "INPUT 1" using the INPUT button on the projector or C INPUT 1 on the remote control. On the On the remote On-screen display (RGB) projector control • When pressing the INPUT button on the projector, input mode switches in order of INPUT1 INPUT2 INPUT3 . • When using the remote control, press the CINPUT 1/DINPUT 2/EINPUT 3 button to switch the INPUT mode. _P. 29 6. Turn the Power off Press the ON/STANDBY button, then press that button again while the confirmation message is displayed, to put the projector into standby mode. On the On-screen Display On the remote projector control • While the cooling fan is running, the Adjustment buttons blinks. (When "Guide LEDs" is set to "On". n page 48) • Unplug the power cord from the AC outlet after the cooling fan stops. _P. 26 17
-
 1
1 -
2
-
3
-
4
-
5
-
6
-
7
-
8
-
9
-
10
-
11
-
12
-
13
-
14
-
15
-
 16
16 -
 17
17 -
 18
18 -
 19
19 -
 20
20 -
 21
21 -
 22
22 -
 23
23 -
 24
24 -
 25
25 -
 26
26 -
27
-
28
-
29
-
30
-
31
-
32
-
33
-
34
-
35
-
36
-
37
-
38
-
39
-
40
-
41
-
42
-
43
-
44
-
45
-
46
-
47
-
48
-
49
-
50
-
51
-
52
-
53
-
54
-
55
-
56
-
57
-
58
-
59
-
60
-
61
-
62
-
63
-
64
-
65
-
66
-
67
-
68
-
69
-
70
 |
 |
