Sharp XR-1XDM XR-1S , XR-1X Operation Manual - Page 30
Turning the Projector On/Off
 |
View all Sharp XR-1XDM manuals
Add to My Manuals
Save this manual to your list of manuals |
Page 30 highlights
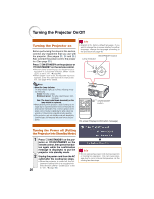
Turning the Projector On/Off Turning the Projector on Before performing the steps in this section, connect any equipment that you use with the projector. (See pages 23, 24 and 25.) Also connect the power cord to the projector. (See page 25.) Press SON/STANDBY on the projector or AON/STANDBY on the remote control. • When the lamp is warming up, the Adjustment buttons blink in a clockwise direction. (When "Guide LEDs" is set to "On". n page 48) • When System Lock is set, the keycode input box appears. Enter the right keycode to start projection. See page 49 for details. Info • English is the factory default language. If you want to change the on-screen display to another language, change the language according to the procedure on page 46. ON/STANDBY button Lamp indicator Note • About the Lamp Indicator The lamp indicator lights up or blinks, indicating the status of the lamp. Green: The lamp is ready. Blinking in green: The lamp is warming up or shutting down. Red: The lamp is shut down abnormally or the lamp should be replaced. • When switching on the projector, a slight flickering of the image may be experienced within the first minute after the lamp has been illuminated. This is normal operation as the lamp's control circuitry is stabilising the lamp output characteristics. It should not be regarded as faulty operation. • If the projector is put into standby mode and immediately turned on again, the lamp may take some time to start projection. ON/STANDBY button On-screen Display (confirmation message) Turning the Power off (Putting the Projector into Standby Mode) 1 2 26 Press SON/STANDBY on the projector or AON/STANDBY on the remote control, then press that button again while the confirmation message is displayed, to put the projector into standby mode. Unplug the power cord from the AC outlet after the cooling fan stops. • When the projector is turned off, the Adjustment buttons blink in a counterclockwise direction. (When "Guide LEDs" is set to "On". n page 48) R Info • Do not unplug the power cord during projection or cooling fan operation. This can cause damage due to rise in internal temperature, as the cooling fan also stops.
-
 1
1 -
2
-
3
-
4
-
5
-
6
-
7
-
8
-
9
-
10
-
11
-
12
-
13
-
14
-
15
-
16
-
17
-
18
-
19
-
20
-
21
-
22
-
23
-
24
-
 25
25 -
 26
26 -
 27
27 -
 28
28 -
 29
29 -
 30
30 -
 31
31 -
 32
32 -
 33
33 -
 34
34 -
 35
35 -
36
-
37
-
38
-
39
-
40
-
41
-
42
-
43
-
44
-
45
-
46
-
47
-
48
-
49
-
50
-
51
-
52
-
53
-
54
-
55
-
56
-
57
-
58
-
59
-
60
-
61
-
62
-
63
-
64
-
65
-
66
-
67
-
68
-
69
-
70
 |
 |
