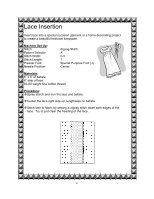
Singer CG-590 Commercial Grade Instruction Manual - Page 19
Turn fabric over and trim excess fabric seam allowances away.
 |
View all Singer CG-590 Commercial Grade manuals
Add to My Manuals
Save this manual to your list of manuals |
Page 19 highlights
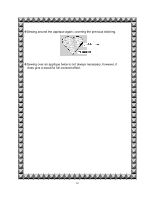
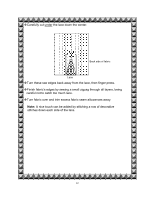
Carefully cut under the lace down the center. Back side of fabric Lace Turn these raw edges back away from the lace, then finger press. Finish fabric's edges by sewing a small zigzag through all layers, being careful not to catch too much lace. Turn fabric over and trim excess fabric seam allowances away. Note: A nice touch can be added by stitching a row of decorative stitches down each side of the lace. 12
-
 1
1 -
2
-
3
-
4
-
5
-
6
-
7
-
8
-
9
-
10
-
11
-
12
-
13
-
 14
14 -
 15
15 -
 16
16 -
 17
17 -
 18
18 -
 19
19 -
 20
20 -
 21
21 -
 22
22 -
 23
23 -
 24
24 -
25
-
26
-
27
-
28
-
29
-
30
-
31
-
32
-
33
-
34
-
35
-
36
-
37
-
38
-
39
-
40
-
41
-
42
-
43
-
44
-
45
-
46
-
47
-
48
-
49
-
50
-
51
-
52
-
53
-
54
-
55
-
56
-
57
-
58
 |
 |

12
±
Carefully cut under
the lace down the center.
±
Turn these raw edges back away from the lace, then finger press.
±
Finish fabric’s edges by sewing a small zigzag through all layers, being
careful not to catch too much lace.
±
Turn fabric over and trim excess fabric seam allowances away.
Note:
A nice touch can be added by stitching a row of decorative
stitches down each side of the lace.
Back side of fabric
Lace