Singer CG-590 Commercial Grade Instruction Manual - Page 21
Leave width at current setting and stitch in place
 |
View all Singer CG-590 Commercial Grade manuals
Add to My Manuals
Save this manual to your list of manuals |
Page 21 highlights
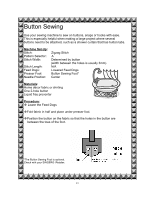
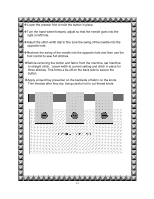
Lower the presser foot to hold the button in place. Turn the hand wheel forward, adjust so that the needle goes into the right or left hole. Adjust the stitch width dial to fine tune the swing of the needle into the opposite hole. Recheck the swing of the needle into the opposite hole and then use the foot control to sew 5-6 stitches. Before removing the button and fabric from the machine, set machine to straight stitch. Leave width at current setting and stitch in place for three stitches. This forms a tie-off on the back side to secure the button. Apply a liquid fray preventer on the backside of fabric on the knots. Trim threads after they dry, being careful not to cut thread knots. 14
-
 1
1 -
2
-
3
-
4
-
5
-
6
-
7
-
8
-
9
-
10
-
11
-
12
-
13
-
14
-
15
-
 16
16 -
 17
17 -
 18
18 -
 19
19 -
 20
20 -
 21
21 -
 22
22 -
 23
23 -
 24
24 -
 25
25 -
 26
26 -
27
-
28
-
29
-
30
-
31
-
32
-
33
-
34
-
35
-
36
-
37
-
38
-
39
-
40
-
41
-
42
-
43
-
44
-
45
-
46
-
47
-
48
-
49
-
50
-
51
-
52
-
53
-
54
-
55
-
56
-
57
-
58
 |
 |
14
±
Lower the presser foot to hold the button in place.
±
Turn the hand wheel forward, adjust so that the needle goes into the
right or left hole.
±
Adjust the stitch width dial to fine tune the swing of the needle into the
opposite hole.
±
Recheck the swing of the needle into the opposite hole and then use the
foot control to sew 5-6 stitches.
±
Before removing the button and fabric from the machine, set machine
to straight stitch.
Leave width at current setting and stitch in place for
three stitches. This forms a tie-off on the back side to secure the
button.
±
Apply a liquid fray preventer on the backside of fabric on the knots.
Trim threads after they dry, being careful not to cut thread knots.