Singer CG-590 Commercial Grade Instruction Manual - Page 37
Seam Allowances with Stretch, Overedged Seam Stitch
 |
View all Singer CG-590 Commercial Grade manuals
Add to My Manuals
Save this manual to your list of manuals |
Page 37 highlights
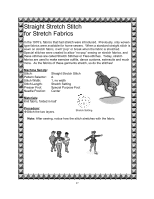
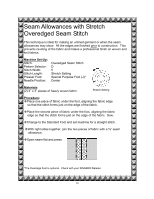
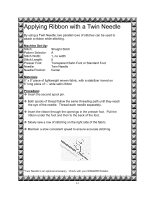
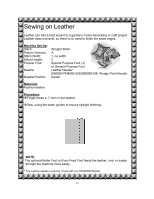
Seam Allowances with Stretch Overedged Seam Stitch This technique is ideal for making an unlined garment or when the seam allowances may show. All the edges are finished prior to construction. This prevents raveling of the fabric and makes a professional finish on woven and knit fabrics. Machine Set-Up: Stitch: Pattern Selector: Stitch Width: Stitch Length: Presser Foot: Needle Position: Overedged Seam Stitch D 5 Stretch Setting Special Purpose Foot (J)* Center Materials: (2) 4" x 3" pieces of heavy woven fabric Stretch Setting Procedure: Place one piece of fabric under the foot, aligning the fabric edge so that the stitch forms just on the edge of the fabric. Place the second piece of fabric under the foot, aligning the fabric edge so that the stitch forms just on the edge of the fabric. Sew. Change to the Standard Foot and set machine for a straight stitch. With right sides together, join the two pieces of fabric with a ⅝" seam allowance. Open seam flat and press. *The Overedge Foot is optional. Check with your SINGER® Retailer. 30
-
 1
1 -
2
-
3
-
4
-
5
-
6
-
7
-
8
-
9
-
10
-
11
-
12
-
13
-
14
-
15
-
16
-
17
-
18
-
19
-
20
-
21
-
22
-
23
-
24
-
25
-
26
-
27
-
28
-
29
-
30
-
31
-
 32
32 -
 33
33 -
 34
34 -
 35
35 -
 36
36 -
 37
37 -
 38
38 -
 39
39 -
 40
40 -
 41
41 -
 42
42 -
43
-
44
-
45
-
46
-
47
-
48
-
49
-
50
-
51
-
52
-
53
-
54
-
55
-
56
-
57
-
58
 |
 |