Singer S10 I STUDIO Instruction Manual - Page 11
Threading the Machine
 |
View all Singer S10 I STUDIO manuals
Add to My Manuals
Save this manual to your list of manuals |
Page 11 highlights
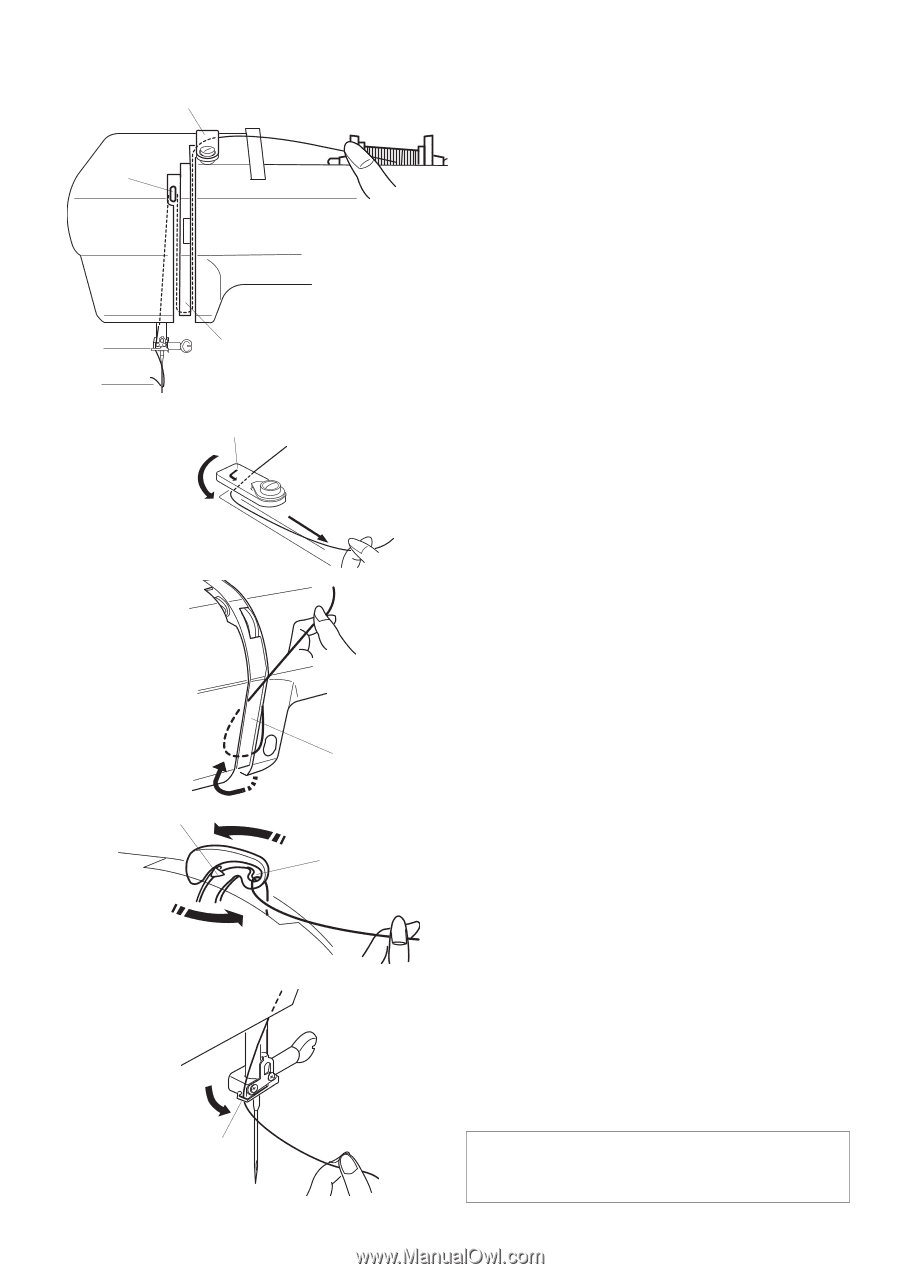
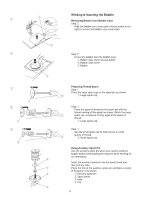
z c Threading the Machine Complete Threading Diagram for Upper Thread See diagram at left. v x b z q x w c e r vb t Step z Raise the presser foot lifter. Bring needle up to its highest position. Draw the loose end of the thread under the thread guide with your left hand, as you hold the thread near the spool with your right hand. Then draw the thread down through the right channel of the thread tension dial. q Thread guide Step x Firmly draw the thread around the thread guide plate and up to the thread take-up lever. w Thread guide plate Step c Slip the thread from back to front through the slit and towards the eye of the take-up lever as shown. The thread tail should be on the left side of the take-up lever. e Slit r Eye of the take-up lever Step v Pull the thread towards the lower thread guide. Step b Slip the thread in the needle bar thread guide from the left. t Needle bar thread guide Thread the needle from manually front to back or use the built-in needle threader. NOTE Refer to page 12 for information about how to use the built-in needle threader. 11
-
 1
1 -
2
-
3
-
4
-
5
-
 6
6 -
 7
7 -
 8
8 -
 9
9 -
 10
10 -
 11
11 -
 12
12 -
 13
13 -
 14
14 -
 15
15 -
 16
16 -
17
-
18
-
19
-
20
-
21
-
22
-
23
-
24
-
25
-
26
-
27
-
28
-
29
-
30
-
31
-
32
-
33
-
34
-
35
-
36
-
37
-
38
-
39
-
40
-
41
-
42
-
43
-
44
-
45
-
46
-
47
-
48
-
49
-
50
-
51
-
52
-
53
-
54
-
55
-
56
 |
 |