Singer XL-550 Futura Instruction Manual - Page 22
Changing Presser Foot, Adjusting Top Thread Tension
 |
View all Singer XL-550 Futura manuals
Add to My Manuals
Save this manual to your list of manuals |
Page 22 highlights
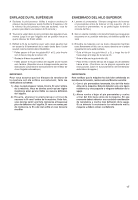
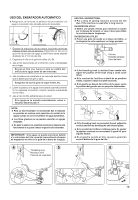
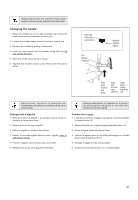
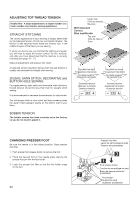
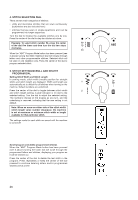
ADJUSTING TOP THREAD TENSION Helpful Hint: A slight adjustment to a higher number or a lower number may improve sewing appearance. STRAIGHT STITCHING The correct appearance of your stitching is largely determined by the balanced tension of both top and bobbin threads. The tension is well balanced when these two threads 'lock' in the middle of layers of the fabric you are sewing. If, when you start to sew, you find that the stitching is irregular, you will need to adjust the tension control. Do this, however, only after you have determined that the machine is correctly threaded (see page 16 - 17). Make all adjustments with presser foot 'down'. A balanced tension (identical stitches both top and bottom) is usually only desirable for straight stitch sewing. ZIGZAG, SATIN STITCH, DECORATIVE and BUTTON HOLE SEWING For zigzag sewing, satin stitch and decorative stitch functions, thread tension should be less than that for straight stitch sewing. It is recommended to decrease thread tension for buttonholes. You will always obtain a nicer stitch and less puckering when the upper thread appears slightly on the bottom side of your fabric. BOBBIN TENSION The bobbin tension has been correctly set at the factory, so you do not need to adjust it. Under side Côté de dessous Reverso Well balanced Correct Bien equilibrada Top side Côté de dessus Cara Top stitch too tight Fil supérieur trop tendu Puntada superior demasiado apretada Decrease tension Diminuer la tension Disminuir tensión Top stitch too loose Fil supérieur trop lâche Puntada superior demasiado floja Increase tension Augmenter la tension Aumentar tensión CHANGING PRESSER FOOT Be sure the needle is in the highest position. Raise presser foot lifter. 1. Push presser foot release button to remove the foot. 2. Place the desired foot on the needle plate aligning the presser foot pin with the foot holder. 3. Lower the presser foot lifter so that the foot holder snaps on the foot. 2 22 Presser foot lifter Levier de verrouillage du pied Palanca pie prensatelas 3 1 Foot release button Touche de verrouillage du pied Boton de desprendimiento prensatelas Foot holder Support du pied Sujetador prensatelas
-
 1
1 -
2
-
3
-
4
-
5
-
6
-
7
-
8
-
9
-
10
-
11
-
12
-
13
-
14
-
15
-
16
-
 17
17 -
 18
18 -
 19
19 -
 20
20 -
 21
21 -
 22
22 -
 23
23 -
 24
24 -
 25
25 -
 26
26 -
 27
27 -
28
-
29
-
30
-
31
-
32
-
33
-
34
-
35
-
36
-
37
-
38
-
39
-
40
-
41
-
42
-
43
-
44
-
45
-
46
-
47
-
48
-
49
-
50
-
51
-
52
-
53
-
54
-
55
-
56
-
57
-
58
-
59
-
60
-
61
-
62
-
63
-
64
-
65
-
66
-
67
-
68
-
69
-
70
-
71
-
72
-
73
-
74
-
75
-
76
-
77
-
78
-
79
-
80
-
81
-
82
-
83
-
84
-
85
-
86
-
87
-
88
-
89
-
90
-
91
-
92
-
93
-
94
-
95
-
96
-
97
-
98
-
99
-
100
-
101
-
102
-
103
-
104
-
105
-
106
-
107
-
108
-
109
-
110
-
111
-
112
-
113
-
114
-
115
-
116
-
117
-
118
-
119
-
120
 |
 |
