Singer XL-550 Futura Instruction Manual - Page 30
Functions Of Operation Switch, Panel
 |
View all Singer XL-550 Futura manuals
Add to My Manuals
Save this manual to your list of manuals |
Page 30 highlights
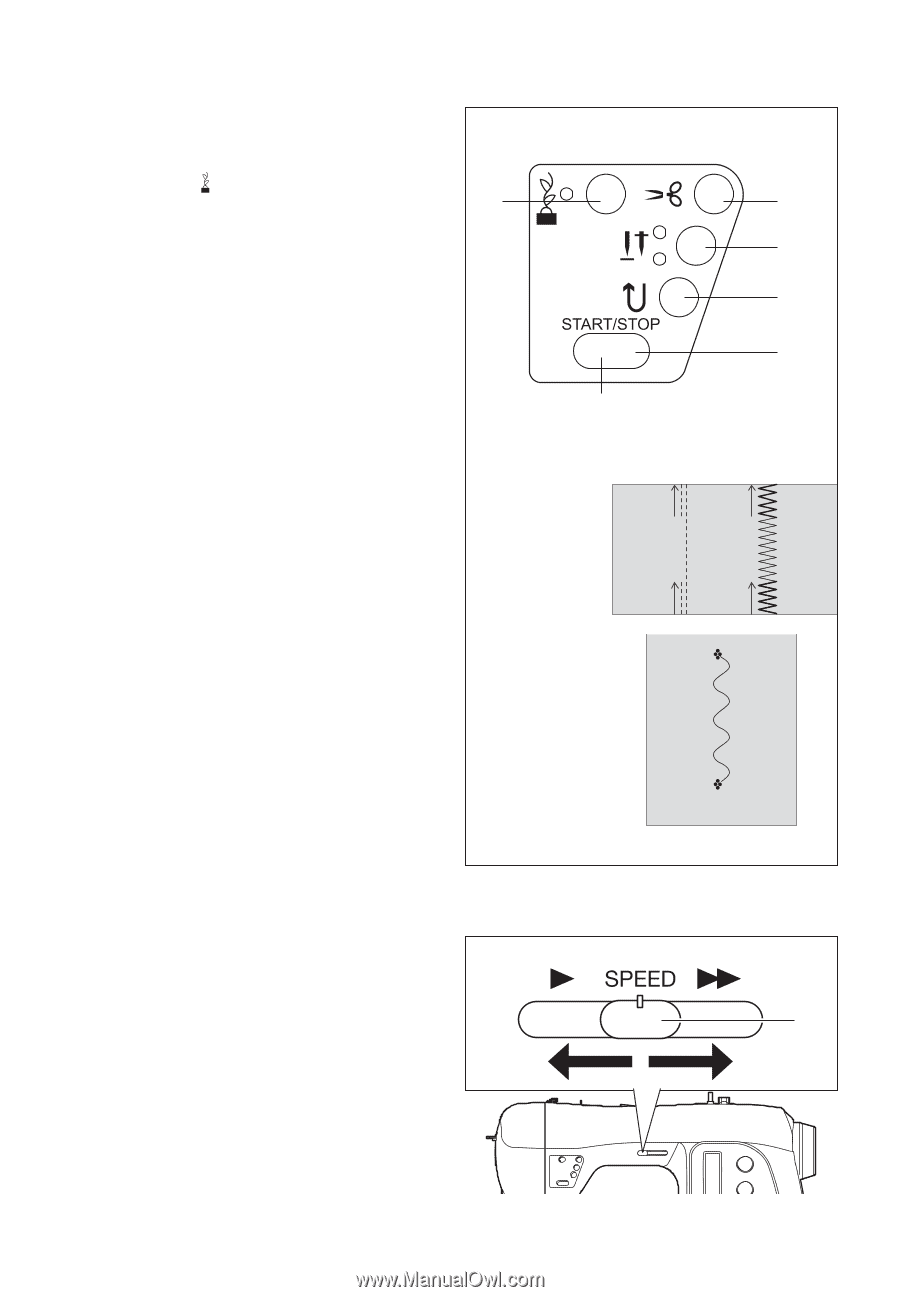
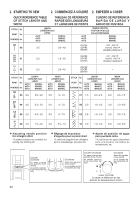
FUNCTIONS OF OPERATION SWITCH PANEL 1. TACKING STITCH MODE BUTTON Press Tacking Stitch and the sewing machine makes 4 tiny fixing stitches to tie off the sewing on all patterns. Press 1 2 START/STOP to sew. Press Tacking Stitch button when the machine is stopped so tacking stitch will be activated, the position of the tacking 3 stitches will be at the exact spot in the pattern where the Tacking Stitch button is pushed. When the function is activated, the LED indicator next to the button is lit red. 4 2. THREAD CUTTER Press Thread Cutter to automatically cut the top and bobbin 5 threads. 3. NEEDLE STOP POSITION SELECTOR BUTTON When the machine is turned on, needle is set at its up-stop position with upper LED lamp lit. When the button is pushed, needle is set at its down-stop position with lower LED lamp lit. Push it again and it will return to its up-stop position with upper LED lamp lit. 4. REVERSE STITCH BUTTON Reverse sewing is carried out by pushing the reverse stitch button. The machine will sew 4 stitches in reverse and stop. 5. START/STOP BUTTON When the Start/Stop button is pushed, the machine starts slowly, and when the button is pushed once more, the machine stops. However, when foot control is plugged, the Start/Stop button will be inactive. 6. LED INDICATOR Green light indicates machine is ready to start. Red light indicates machine is operating. Flashing red light indicates a problem or an error. * Flashing for 2 - 3 seconds shows that an incorrect operation was made. * Continuous flashing indicates that the machine malfunctions. 6 Reverse stitch function for straight and zigzag stitches Fonction couture arrière pour les points droits et zigzags Función de costura hacia atrás para costuras rectas y zigzag Tacking stitch function for tie-off of other stitches Fonction de point de faufilage pour la jonction avec d'autres points Función de remate para terminación de otras puntadas. 7. SPEED CONTROL LEVER Sliding the lever sets desired sewing speed. When foot control is used, the lever serves as a top speed limiter. 7 30
-
 1
1 -
2
-
3
-
4
-
5
-
6
-
7
-
8
-
9
-
10
-
11
-
12
-
13
-
14
-
15
-
16
-
17
-
18
-
19
-
20
-
21
-
22
-
23
-
24
-
 25
25 -
 26
26 -
 27
27 -
 28
28 -
 29
29 -
 30
30 -
 31
31 -
 32
32 -
 33
33 -
 34
34 -
 35
35 -
36
-
37
-
38
-
39
-
40
-
41
-
42
-
43
-
44
-
45
-
46
-
47
-
48
-
49
-
50
-
51
-
52
-
53
-
54
-
55
-
56
-
57
-
58
-
59
-
60
-
61
-
62
-
63
-
64
-
65
-
66
-
67
-
68
-
69
-
70
-
71
-
72
-
73
-
74
-
75
-
76
-
77
-
78
-
79
-
80
-
81
-
82
-
83
-
84
-
85
-
86
-
87
-
88
-
89
-
90
-
91
-
92
-
93
-
94
-
95
-
96
-
97
-
98
-
99
-
100
-
101
-
102
-
103
-
104
-
105
-
106
-
107
-
108
-
109
-
110
-
111
-
112
-
113
-
114
-
115
-
116
-
117
-
118
-
119
-
120
 |
 |