Singer XL-550 Futura Instruction Manual - Page 42
Blind Stitch, Multi-stitch Zigzag
 |
View all Singer XL-550 Futura manuals
Add to My Manuals
Save this manual to your list of manuals |
Page 42 highlights
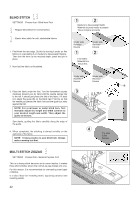
BLIND STITCH 06 SETTINGS :Presser foot - Blind Hem Foot - Regular blind stitch for normal fabrics 1 2 Medium to heavyweight fabric Material de peso medio a pesado Tissus moyens et lourds - Elastic blind stitch for soft, stretchable fabrics 06 1. First finish the raw edge. Do this by turning it under on fine fabrics or overcasting it on medium to heavyweight fabrics. Then turn the hem up the required depth, press and pin in place. 2. Now fold the fabric as illustrated. Under side Reverso Envers 1 Under side Reverso Envers 2 Fine fabric Material fino Tissus fins Under side Reverso Envers Under side Reverso Envers B 3. Place the fabric under the foot. Turn the handwheel counter 3 clockwise (toward you) by hand until the needle swings fully to the left. It should just pierce the fold of the fabric. If it does A not, adjust the guide (B) on the Blind hem Foot (A) so that the needle just pierces the fabric fold and the guide just rests against the fold. NOTE: For a narrower or wider blind hem, first manually adjust the length and width controls to your desired length and width. Then adjust the guide on the foot. Sew slowly, guiding the fabric carefully along the edge of the guide. 4. When completed, the stitching is almost invisible on the right side of the fabric. NOTE: It takes practice to sew blind hem. Always make a sewing test first. 4 Top side Cara Endroit MULTI-STITCH ZIGZAG 07 SETTINGS :Presser foot - General Purpose Foot This is a strong stitch because as its name implies, it makes three short stitches where the normal zig-zag makes only one. For this reason, it is recommended for overcasting most types of fabrics. It is also ideal for mending tears, applying patches and inserting elastic. 42
-
 1
1 -
2
-
3
-
4
-
5
-
6
-
7
-
8
-
9
-
10
-
11
-
12
-
13
-
14
-
15
-
16
-
17
-
18
-
19
-
20
-
21
-
22
-
23
-
24
-
25
-
26
-
27
-
28
-
29
-
30
-
31
-
32
-
33
-
34
-
35
-
36
-
 37
37 -
 38
38 -
 39
39 -
 40
40 -
 41
41 -
 42
42 -
 43
43 -
 44
44 -
 45
45 -
 46
46 -
 47
47 -
48
-
49
-
50
-
51
-
52
-
53
-
54
-
55
-
56
-
57
-
58
-
59
-
60
-
61
-
62
-
63
-
64
-
65
-
66
-
67
-
68
-
69
-
70
-
71
-
72
-
73
-
74
-
75
-
76
-
77
-
78
-
79
-
80
-
81
-
82
-
83
-
84
-
85
-
86
-
87
-
88
-
89
-
90
-
91
-
92
-
93
-
94
-
95
-
96
-
97
-
98
-
99
-
100
-
101
-
102
-
103
-
104
-
105
-
106
-
107
-
108
-
109
-
110
-
111
-
112
-
113
-
114
-
115
-
116
-
117
-
118
-
119
-
120
 |
 |
