Singer XL-550 Futura Instruction Manual - Page 26
Stitch Selection Dial, Stitch Setting/scroll And Delete, Program Dial
 |
View all Singer XL-550 Futura manuals
Add to My Manuals
Save this manual to your list of manuals |
Page 26 highlights
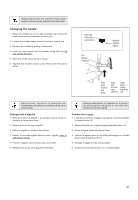
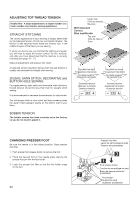
4. STITCH SELECTION DIAL There are two main categories of stitches: • utility and decorative stitches that are sewn continuously (buttonholes are also included here) • stitches that are sewn in single repetitions and can be programmed into longer sequences. Turn the dial to browse the available stitches one by one. Press the center of the dial to step ten stitches at a time. Example: To select stitch number 52, press the center of the dial five times and then turn the dial two steps clockwise. When the "ABC" Program Mode button has been pressed (see 3 above) turning the Stitch Selection Dial will browse through letters and other programmable stitches. Selected stitch will be sewn in one repetition only. Press the center of the dial to program selected stitch. 5. STITCH SETTING/SCROLL AND DELETE PROGRAM DIAL Setting Stitch Width and Stitch Length In sewing mode, stitch width (needle position for straight stitch) and stitch length are displayed. Width and length are automatically set to default for all stitches when turning on the machine. Default numbers are underlined. Press the center of the dial to toggle between stitch width and stitch length setting. A LED indicator is lit next to the selected setting. Turn the dial to adjust the selected setting. The numbers change on the display as you turn, and the underlining is removed, indicating that the new setting is not default. Note: When an arrow on either side of the stitch width/ stitch length value number disappear, the machine is set at maximum or minimum stitch width or length available for that particular stitch. The settings made for each stitch are saved until the machine is turned off. Scroll program and delete programmed stitches When the "ABC" Program Mode button has been pressed (see 3 above) turning the lower dial will scroll through the programmed letters and stitches, displaying your program as it will be stitched out. Press the center of the dial to delete the last stitch in the program. Press repeatedly or keep the center of the dial pressed to continue deleting letters and/or programmed stitches one at a time. 26
-
 1
1 -
2
-
3
-
4
-
5
-
6
-
7
-
8
-
9
-
10
-
11
-
12
-
13
-
14
-
15
-
16
-
17
-
18
-
19
-
20
-
 21
21 -
 22
22 -
 23
23 -
 24
24 -
 25
25 -
 26
26 -
 27
27 -
 28
28 -
 29
29 -
 30
30 -
 31
31 -
32
-
33
-
34
-
35
-
36
-
37
-
38
-
39
-
40
-
41
-
42
-
43
-
44
-
45
-
46
-
47
-
48
-
49
-
50
-
51
-
52
-
53
-
54
-
55
-
56
-
57
-
58
-
59
-
60
-
61
-
62
-
63
-
64
-
65
-
66
-
67
-
68
-
69
-
70
-
71
-
72
-
73
-
74
-
75
-
76
-
77
-
78
-
79
-
80
-
81
-
82
-
83
-
84
-
85
-
86
-
87
-
88
-
89
-
90
-
91
-
92
-
93
-
94
-
95
-
96
-
97
-
98
-
99
-
100
-
101
-
102
-
103
-
104
-
105
-
106
-
107
-
108
-
109
-
110
-
111
-
112
-
113
-
114
-
115
-
116
-
117
-
118
-
119
-
120
 |
 |
