Sony DAVHDX576WF Operating Instructions - Page 87
If sound transmission is unstable
 |
UPC - 027242728943
View all Sony DAVHDX576WF manuals
Add to My Manuals
Save this manual to your list of manuals |
Page 87 highlights
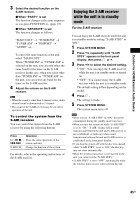
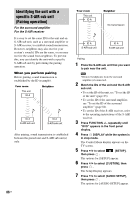
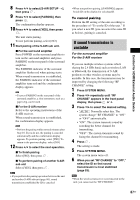
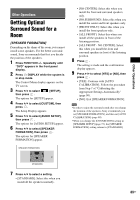
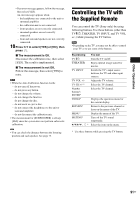
Control for HDMI/External Audio Device 8 Press X/x to select [S-AIR SETUP t], then press . 9 Press X/x to select [PAIRING], then press . The confirmation display appears. 10 Press C/c to select [YES], then press . The unit starts pairing. To not perform pairing, select [NO]. 11 Start pairing of the S-AIR sub unit. x For the surround amplifier Press POWER on the surround amplifier to turn on the surround amplifier and press PAIRING on the rear panel of the surround amplifier. The PAIRING indicator of the surround amplifier flashes red when pairing starts. When sound transmission is established, the PAIRING indicator of the surround amplifier turns red and the confirmation display appears. Tip • To press PAIRING on the rear panel of the surround amplifier, a slim instrument, such as a paper clip, can be used. x For the S-AIR receiver Refer to the operating instructions of the S-AIR receiver. When sound transmission is established, the confirmation display appears. Note • Perform the pairing within several minutes after Step 10. If you do not, the pairing is canceled automatically and the confirmation display appears. To perform pairing, select [YES]. To return to the previous display, select [NO]. 12 Press C/c to select the next operation. x To finish pairing Select [NO], then press . x To perform pairing of another S-AIR sub unit Select [YES], then press . Note • If you perform the pairing operation between the unit and another S-AIR sub unit (page 86), sound transmission established by ID is canceled. • When you perform pairing, [(PAIRING)] appears beside ID on the display for selecting ID. To cancel pairing Perform the ID setting of the unit according to the procedure of "To set the ID of the unit." If you select a new ID (you can select the same ID as before), pairing is canceled. If sound transmission is unstable For the surround amplifier For the S-AIR receiver If you use multiple wireless systems which sharing the 2.4 GHz band, such as wireless LAN or Bluetooth, the transmission of S-AIR products or other wireless systems may be unstable. In this case, the transmission may be improved by changing the following "RF CHANGE" setting. 1 Press SYSTEM MENU. 2 Press X/x repeatedly until "RF CHANGE" appears in the front panel display, then press or c. 3 Press X/x to select the desired setting. • "AUTO": Normally select this. The system change "RF CHANGE" to "ON" or "OFF" automatically. • "ON": The system transmits sound by searching the better channel for transmitting. • "OFF": The system transmits sound by fixing the channel for transmitting. 4 Press . The setting is made. 5 Press SYSTEM MENU. The system menu turns off. 6 When you set "RF CHANGE" to "OFF," select the ID so that sound transmission is most stabilized (page 83). Note • When the wireless transceiver is not inserted in the unit, you cannot set the "RF CHANGE." 87US
-
 1
1 -
2
-
3
-
4
-
5
-
6
-
7
-
8
-
9
-
10
-
11
-
12
-
13
-
14
-
15
-
16
-
17
-
18
-
19
-
20
-
21
-
22
-
23
-
24
-
25
-
26
-
27
-
28
-
29
-
30
-
31
-
32
-
33
-
34
-
35
-
36
-
37
-
38
-
39
-
40
-
41
-
42
-
43
-
44
-
45
-
46
-
47
-
48
-
49
-
50
-
51
-
52
-
53
-
54
-
55
-
56
-
57
-
58
-
59
-
60
-
61
-
62
-
63
-
64
-
65
-
66
-
67
-
68
-
69
-
70
-
71
-
72
-
73
-
74
-
75
-
76
-
77
-
78
-
79
-
80
-
81
-
 82
82 -
 83
83 -
 84
84 -
 85
85 -
 86
86 -
 87
87 -
 88
88 -
 89
89 -
 90
90 -
 91
91 -
 92
92 -
93
-
94
-
95
-
96
-
97
-
98
-
99
-
100
-
101
-
102
-
103
-
104
-
105
-
106
-
107
-
108
-
109
-
110
-
111
-
112
-
113
-
114
-
115
-
116
-
117
-
118
-
119
-
120
-
121
-
122
-
123
-
124
 |
 |
