Sony DCR-HC30 Computer Applications Guide - Page 25
For SEL/PUSH EXEC dial models, SELECT DISC]. - touch screen
 |
UPC - 027242644588
View all Sony DCR-HC30 manuals
Add to My Manuals
Save this manual to your list of manuals |
Page 25 highlights
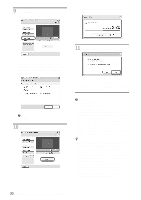
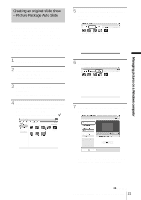
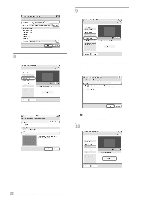
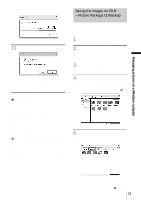
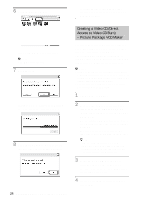
5 Connect your camcorder to a computer via a USB cable (supplied) (p. 11). [Picture Package Menu] starts up automatically. b Note • When you connect your camcorder to a computer, make sure you insert the connector in the correct direction. If you insert the connector forcibly, it may be damaged, and causes a malfunction of your camcorder. 6 For touch panel models, select [BURN VCD] on or of your camcorder. For SEL/PUSH EXEC dial models, press BURN DVD/VCD of your camcorder, then select [VCD] on the [SELECT DISC]. [Picture Package VCD Maker] starts up. The procedure of the menu settings varies depending on the model. 7 Place a new CD-R in the disc drive of the computer. b Note • CD-RWs cannot be used. 8 For touch panel models, select [EXEC] of your camcorder. For SEL/PUSH EXEC dial models, press the dial of your camcorder. . 0:00:00:00 BURN VCD START CREATE VCD? EXEC CANCEL The status of the operation on your computer is displayed on the LCD screen of your camcorder. CAPTURING: The picture recorded on the tape is being copied to the computer. CONVERTING: The picture is being converted to the MPEG1 format. WRITING: The picture is being written onto the CD-R. b Notes • The screen varies depending on the model. • You cannot cancel the operation after [Finalizing VCD.] is displayed on the LCD screen of your camcorder. 9 Follow the steps below to finish creating a Video CD. For touch panel models Select [ END] or [NO] of your camcorder. For SEL/PUSH EXEC dial models Press BURN DVD/VCD of your camcorder. The disc tray comes out automatically. . 0:00:00:00 BURN VCD COMPLETED Create another copy? Disctray opens. YES NO To create another Video CD with the same content, follow the on-screen instructions, place a new CD-R in the disc drive, then repeat steps 8 and 9. b Note • The screen varies depending on the model. z Tip • You can also operate steps 8 and 9 from your computer. b Notes • The importing of the picture stops automatically, when there is a blank portion of 10 seconds or longer on the tape. • Select a hard disk that has enough space (more than about 6 GB) for the [Temporary folder] on the [Options] screen. ,continued Managing pictures on a Windows computer 25 Managing pictures on a Windows computer
-
 1
1 -
2
-
3
-
4
-
5
-
6
-
7
-
8
-
9
-
10
-
11
-
12
-
13
-
14
-
15
-
16
-
17
-
18
-
19
-
 20
20 -
 21
21 -
 22
22 -
 23
23 -
 24
24 -
 25
25 -
 26
26 -
 27
27 -
 28
28 -
 29
29 -
 30
30 -
31
-
32
-
33
-
34
-
35
-
36
-
37
-
38
-
39
-
40
-
41
-
42
-
43
-
44
 |
 |
