Sony DCR-HC85 Camera Operations Guide - Page 15
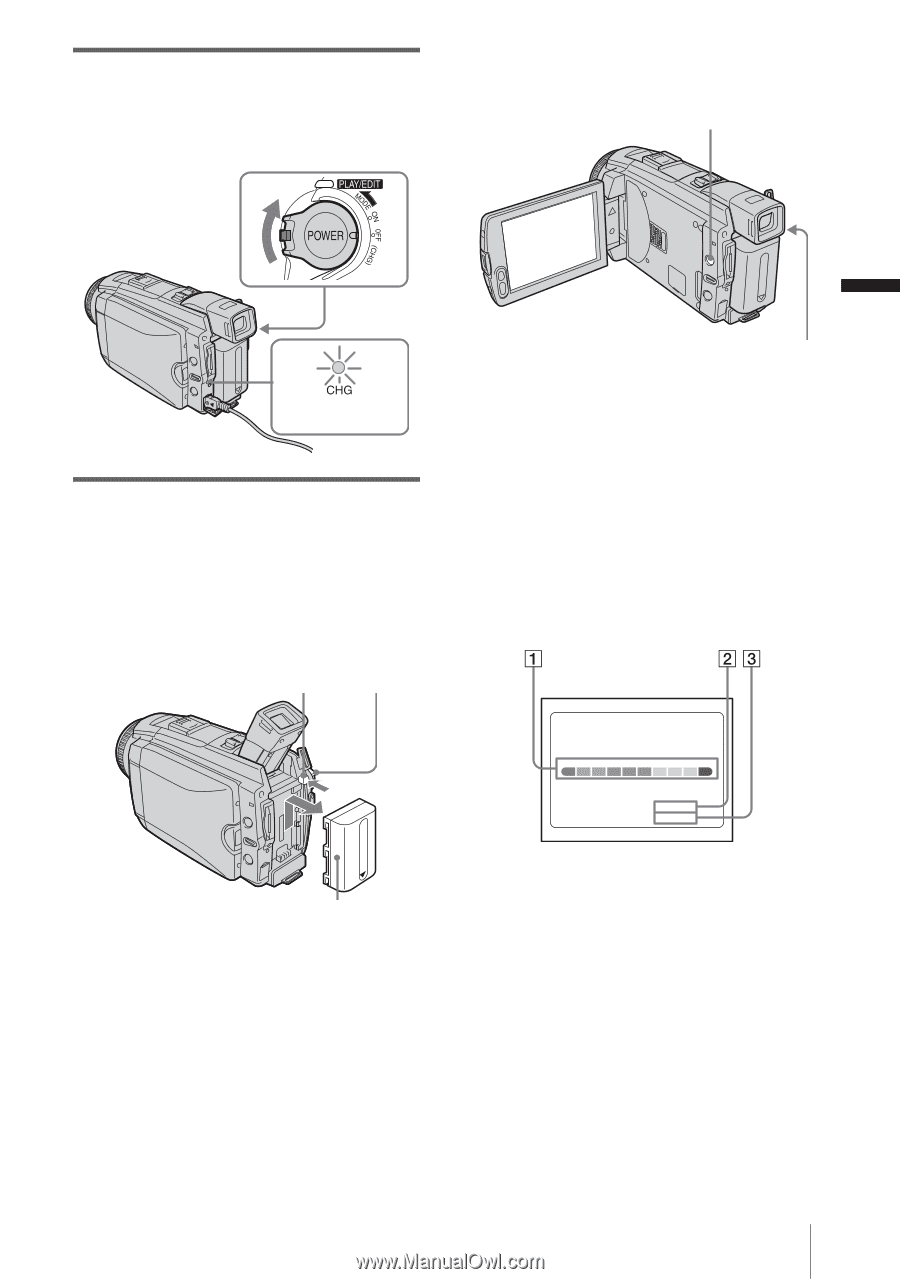
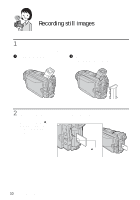
Getting started, After charging the battery, To remove the battery pack
 |
View all Sony DCR-HC85 manuals
Add to My Manuals
Save this manual to your list of manuals |
Page 15 highlights
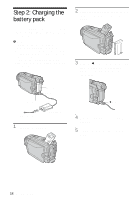
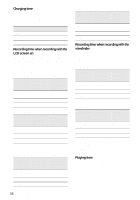
6 Slide the POWER switch up to OFF (CHG). The CHG (charge) lamp lights up and charging starts. To check the remaining battery - Battery Info DISPLAY/BATT INFO Getting started CHG (charge) lamp After charging the battery The CHG (charge) lamp turns off when the battery is fully charged. Disconnect the AC Adaptor from the DC IN jack. To remove the battery pack POWER PUSH switch Battery pack 1 Set the POWER switch to OFF (CHG). 2 Lift up the viewfinder. 3 Slide the battery pack out in the direction of the arrow while pressing the PUSH button. b Note • If you do not use the battery pack for a long time, use up the battery pack completely before storing it. See page 130 about storage of the battery pack. POWER switch You can check the battery's current charge level and its current remaining recording time both during charging or when the power is turned off. 1 Set the POWER switch to OFF (CHG). 2 Press OPEN and open the LCD panel. 3 Press DISPLAY/BATT INFO. The battery information appears for about 7 seconds. Keep the button pressed to view it for about 20 seconds. BATTERY INFO BATTERY CHARGE LEVEL 0% 50% 100% REC TIME AVAILABLE LCD SCREEN: 54 min VIEWFINDER: 72 min A Battery charge level: Displays approximate remaining amount of power left in the battery pack. B Approximate possible recording time using the LCD panel. C Approximate possible recording time using the viewfinder. Getting started 15
-
 1
1 -
2
-
3
-
4
-
5
-
6
-
7
-
8
-
9
-
 10
10 -
 11
11 -
 12
12 -
 13
13 -
 14
14 -
 15
15 -
 16
16 -
 17
17 -
 18
18 -
 19
19 -
 20
20 -
21
-
22
-
23
-
24
-
25
-
26
-
27
-
28
-
29
-
30
-
31
-
32
-
33
-
34
-
35
-
36
-
37
-
38
-
39
-
40
-
41
-
42
-
43
-
44
-
45
-
46
-
47
-
48
-
49
-
50
-
51
-
52
-
53
-
54
-
55
-
56
-
57
-
58
-
59
-
60
-
61
-
62
-
63
-
64
-
65
-
66
-
67
-
68
-
69
-
70
-
71
-
72
-
73
-
74
-
75
-
76
-
77
-
78
-
79
-
80
-
81
-
82
-
83
-
84
-
85
-
86
-
87
-
88
-
89
-
90
-
91
-
92
-
93
-
94
-
95
-
96
-
97
-
98
-
99
-
100
-
101
-
102
-
103
-
104
-
105
-
106
-
107
-
108
-
109
-
110
-
111
-
112
-
113
-
114
-
115
-
116
-
117
-
118
-
119
-
120
-
121
-
122
-
123
-
124
-
125
-
126
-
127
-
128
-
129
-
130
-
131
-
132
-
133
-
134
-
135
-
136
-
137
-
138
-
139
-
140
-
141
-
142
-
143
-
144
-
145
-
146
-
147
-
148
-
149
-
150
-
151
-
152
 |
 |