Sony DCR-HC85 Camera Operations Guide - Page 86
Dv Out, Video Input, Usb-camera, Usb-ply/edt - audio video cable to usb
 |
View all Sony DCR-HC85 manuals
Add to My Manuals
Save this manual to your list of manuals |
Page 86 highlights
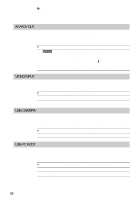
b Note • When you connect your camcorder to outside power sources, [BRIGHT] is automatically selected for the setting. • When you select [BRIGHT], battery life is reduced by about 10 percent during recording. A/VcDV OUT You can connect a digital device and an analog device to your camcorder and convert the signal transmitted from the connected devices to the appropriate signal on your camcorder. GOFF ON ( Select when not using the Digital convert function. ) To output analog images and sound in digital format using your camcorder. The analog signal input to the AUDIO/VIDEO jack of your camcorder will be converted and output from the DV Interface of your camcorder. For details, refer to the "Computer Applications Guide." VIDEO INPUT When you connect your camcorder to another device using the supplied A/V connecting cable, set the type of plug you are going to use for the connection. GVIDEO S VIDEO Select to input a video signal. Select to input an S video signal. USB-CAMERA You can connect a USB cable (supplied) to your camcorder, and view the picture displayed on the screen of your camcorder on your computer (USB Streaming). For details, refer to the "Computer Applications Guide." GOFF USB STREAM Select to deactivate the USB Streaming function. Select to activate the USB Streaming function. USB-PLY/EDT You can connect a USB cable (supplied) to your camcorder, and view the picture on the tape or "Memory Stick Duo" in your camcorder on your computer. For details, refer to the "Computer Applications Guide." GSTD-USB PictBridge USB STREAM Select to view the picture on the "Memory Stick Duo." Select to connect the PictBridge compliant printer (p. 110). Select to view the picture on the tape. 86 Using the Menu
-
 1
1 -
2
-
3
-
4
-
5
-
6
-
7
-
8
-
9
-
10
-
11
-
12
-
13
-
14
-
15
-
16
-
17
-
18
-
19
-
20
-
21
-
22
-
23
-
24
-
25
-
26
-
27
-
28
-
29
-
30
-
31
-
32
-
33
-
34
-
35
-
36
-
37
-
38
-
39
-
40
-
41
-
42
-
43
-
44
-
45
-
46
-
47
-
48
-
49
-
50
-
51
-
52
-
53
-
54
-
55
-
56
-
57
-
58
-
59
-
60
-
61
-
62
-
63
-
64
-
65
-
66
-
67
-
68
-
69
-
70
-
71
-
72
-
73
-
74
-
75
-
76
-
77
-
78
-
79
-
80
-
 81
81 -
 82
82 -
 83
83 -
 84
84 -
 85
85 -
 86
86 -
 87
87 -
 88
88 -
 89
89 -
 90
90 -
 91
91 -
92
-
93
-
94
-
95
-
96
-
97
-
98
-
99
-
100
-
101
-
102
-
103
-
104
-
105
-
106
-
107
-
108
-
109
-
110
-
111
-
112
-
113
-
114
-
115
-
116
-
117
-
118
-
119
-
120
-
121
-
122
-
123
-
124
-
125
-
126
-
127
-
128
-
129
-
130
-
131
-
132
-
133
-
134
-
135
-
136
-
137
-
138
-
139
-
140
-
141
-
142
-
143
-
144
-
145
-
146
-
147
-
148
-
149
-
150
-
151
-
152
 |
 |