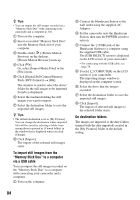
Sony DCR-SR200C Handycam® Handbook - Page 85
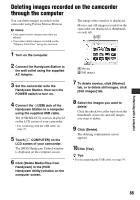
Deleting images recorded on the camcorder through the computer
 |
View all Sony DCR-SR200C manuals
Add to My Manuals
Save this manual to your list of manuals |
Page 85 highlights
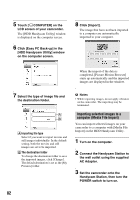
Deleting images recorded on the camcorder through the computer You can delete images recorded on the camcorder using Picture Motion Browser. b Notes • You cannot restore images once they are deleted. • You cannot delete images recorded on the "Memory Stick Duo" using this function. The image select window is displayed. Movies and still images recorded on the camcorder are displayed as thumbnails on each tab. 1 Turn on the computer. 2 Connect the Handycam Station to the wall outlet using the supplied AC Adaptor. 3 Set the camcorder onto the Handycam Station, then turn the POWER switch to turn on. 4 Connect the (USB) jack of the Handycam Station to a computer using the supplied USB cable. The [USB SELECT] screen is displayed on the LCD screen of your camcorder. • For connecting with the USB cable, see page 78. 5 Touch [ COMPUTER] on the LCD screen of your camcorder. The [HDD Handycam Utility] window is displayed on the computer screen. 6 Click [Delete Media Files from Handycam] in the [HDD Handycam Utility] window on the computer screen. A Movies B Still images 7 To delete movies, click [Movies] tab, or to delete still images, click [Still images] tab. 8 Select the images you want to delete. Click the check box at the top left on the thumbnails of movies and still images you want to delete. 9 Click [Delete]. The deleting confirmation screen appears. 10Click [Yes]. z Tips • For disconnecting the USB cable, see page 79. Performing with a computer 85
-
 1
1 -
2
-
3
-
4
-
5
-
6
-
7
-
8
-
9
-
10
-
11
-
12
-
13
-
14
-
15
-
16
-
17
-
18
-
19
-
20
-
21
-
22
-
23
-
24
-
25
-
26
-
27
-
28
-
29
-
30
-
31
-
32
-
33
-
34
-
35
-
36
-
37
-
38
-
39
-
40
-
41
-
42
-
43
-
44
-
45
-
46
-
47
-
48
-
49
-
50
-
51
-
52
-
53
-
54
-
55
-
56
-
57
-
58
-
59
-
60
-
61
-
62
-
63
-
64
-
65
-
66
-
67
-
68
-
69
-
70
-
71
-
72
-
73
-
74
-
75
-
76
-
77
-
78
-
79
-
 80
80 -
 81
81 -
 82
82 -
 83
83 -
 84
84 -
 85
85 -
 86
86 -
 87
87 -
 88
88 -
 89
89 -
 90
90 -
91
-
92
-
93
-
94
-
95
-
96
-
97
-
98
-
99
-
100
-
101
-
102
-
103
-
104
-
105
-
106
-
107
-
108
-
109
-
110
-
111
-
112
-
113
-
114
-
115
-
116
-
117
-
118
-
119
-
120
-
121
-
122
-
123
-
124
-
125
-
126
-
127
-
128
-
129
-
130
-
131
 |
 |