Sony DG510 Operating Instructions - Page 59
Naming inputs, Changing the display, All inputs except the FM and AM, FM and AM band
 |
UPC - 027242705685
View all Sony DG510 manuals
Add to My Manuals
Save this manual to your list of manuals |
Page 59 highlights
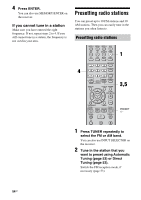
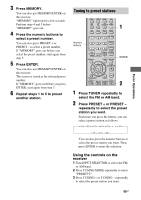
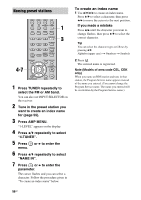
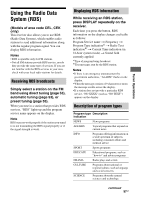
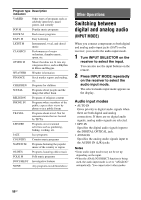
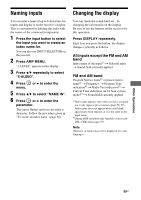
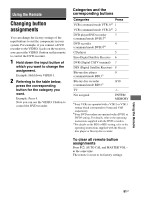
Naming inputs You can enter a name of up to 8 characters for inputs and display it on the receiver's display. This is convenient for labeling the jacks with the names of the connected components. 1 Press the input button to select the input you want to create an index name for. You can also use INPUT SELECTOR on the receiver. 2 Press AMP MENU. "1-LEVEL" appears on the display. 3 Press V/v repeatedly to select "5-AUDIO". 4 Press menu. or b to enter the 5 Press V/v to select "NAME IN". 6 Press or b to enter the parameter. The cursor flashes and you can select a character. Follow the procedure given in "To create an index name" (page 56). Changing the display You can check the sound field, etc., by changing the information on the display. Be sure to use the buttons on the receiver for this operation. Press DISPLAY repeatedly. Each time you press the button, the display changes cyclically as follows. All inputs except the FM and AM band Index name of the inputa) t Selected input t Sound field currently applied FM and AM band Program Service nameb) or preset station namea) t Frequency t Program Type indicationb) t Radio Text indicationb) t Current Time indication (in 24-hour system mode)b) t Sound field currently applied a)Index name appears only when you have assigned one to the input or preset station (page 56, 59). Index name does not appear when only blank spaces have been entered, or it is the same as the input name. b)During RDS reception only (models of area code CEL, CEK only) (page 57). Note Character or marks may not be displayed for some languages. Other Operations 59GB
-
 1
1 -
2
-
3
-
4
-
5
-
6
-
7
-
8
-
9
-
10
-
11
-
12
-
13
-
14
-
15
-
16
-
17
-
18
-
19
-
20
-
21
-
22
-
23
-
24
-
25
-
26
-
27
-
28
-
29
-
30
-
31
-
32
-
33
-
34
-
35
-
36
-
37
-
38
-
39
-
40
-
41
-
42
-
43
-
44
-
45
-
46
-
47
-
48
-
49
-
50
-
51
-
52
-
53
-
 54
54 -
 55
55 -
 56
56 -
 57
57 -
 58
58 -
 59
59 -
 60
60 -
 61
61 -
 62
62 -
 63
63 -
 64
64 -
65
-
66
-
67
-
68
-
69
-
70
-
71
-
72
 |
 |
