Sony DPP-F700 Operating Instructions - Page 55
Performing “CreativePrint” (Calendar/Layout print/ID Photo), Making a Calendar
 |
UPC - 027242776197
View all Sony DPP-F700 manuals
Add to My Manuals
Save this manual to your list of manuals |
Page 55 highlights
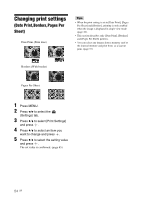
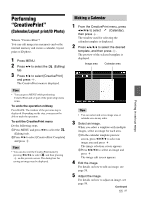
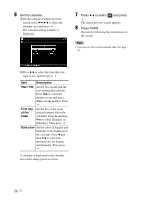
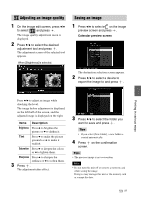
Performing "CreativePrint" (Calendar/Layout print/ID Photo) What is "CreativePrint"? You can edit images in a memory card or the internal memory and create a calendar, layout print or ID photo. 1 Press MENU. 2 Press B/b to select the tab. (Editing) 3 Press v/V to select [CreativePrint] and press . The CreativePrint menu is displayed. Tips • You can press MENU while performing CreativePrint and set part of the print setup menu items. To undo the operation midway Press BACK. The window of the previous step is displayed. Depending on the step, you may not be able to undo the operation. To exit the CreativePrint menu Do the following steps. 1Press MENU and press B/b to select the (Editing) tab. 2Press v/V to select [CreativePrint Complete] and press . Tips • You can also exit the CreativePrint menu by pressing B/b/v/V to select and then pressing on the preview screen. The dialog box for saving an image may be displayed. Making a Calendar 1 From the CreativePrint menu, press B/b/v/V to select then press . (Calendar), The window used for selecting the calendar template is displayed. 2 Press B/b/v/V to select the desired template, and then press . The preview of the selected template is displayed. Image area Calendar area Tips • You can select and set an image area or calendar area in any order. 3 Select an image. When you select a template with multiple images, select an image for each area. 1On the calendar template preview screen, press B/b/v/V to select an image area and press . The image selection screen appears. 2Press B/b/v/V to select an image and press . The image edit screen appears. 4 Edit the image. For details on how to edit an image, see page 58. 5 Adjust the image. For details on how to adjust an image, see page 59. Continued 55 GB Printing in various ways
-
 1
1 -
2
-
3
-
4
-
5
-
6
-
7
-
8
-
9
-
10
-
11
-
12
-
13
-
14
-
15
-
16
-
17
-
18
-
19
-
20
-
21
-
22
-
23
-
24
-
25
-
26
-
27
-
28
-
29
-
30
-
31
-
32
-
33
-
34
-
35
-
36
-
37
-
38
-
39
-
40
-
41
-
42
-
43
-
44
-
45
-
46
-
47
-
48
-
49
-
 50
50 -
 51
51 -
 52
52 -
 53
53 -
 54
54 -
 55
55 -
 56
56 -
 57
57 -
 58
58 -
 59
59 -
 60
60 -
61
-
62
-
63
-
64
-
65
-
66
-
67
-
68
-
69
-
70
-
71
-
72
-
73
-
74
-
75
-
76
-
77
-
78
-
79
-
80
-
81
-
82
-
83
-
84
-
85
-
86
-
87
-
88
-
89
-
90
-
91
-
92
-
93
-
94
-
95
-
96
-
97
-
98
-
99
-
100
-
101
-
102
-
103
-
104
-
105
-
106
-
107
-
108
-
109
 |
 |
