Sony DPP-F700 Operating Instructions - Page 70
Connecting to a computer, Selecting the function of this unit, Turn this unit on.
 |
UPC - 027242776197
View all Sony DPP-F700 manuals
Add to My Manuals
Save this manual to your list of manuals |
Page 70 highlights
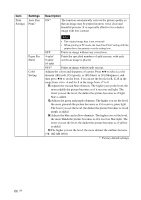
Connecting to a computer 1 Connect this unit to the AC power source. (.page 22) 2 Connect the computer and this unit with a commercially available USB cable. Selecting the function of this unit 1 Turn your computer on. The PC mode selection screen appears on the LCD of this unit. To USB B connector Computer To USB connector Notes • Use a USB cable with a B-type plug (for the USB B connector of this unit) shorter than 3 meters. 3 Turn this unit on. (.page 23) 70 GB Tips • If the computer is already switched on, the mode selection screen is displayed when this unit is connected to the computer. 2 Press B/b to select [Use internal memory] or [Print] and then press . For how to use the various functions, see the following pages. • [Use internal memory] .page 71 • [Print] .page 73 The first time you select [Print], install the supplied printer driver before pressing the button. (page 73) Tips • If you disconnect this unit from your computer and reconnect it, the PC mode selection screen appears and you can change the mode. For details on how to disconnect this unit from your computer, see page 72. Notes • The dialog boxes shown in this section are from Windows Vista, unless otherwise specified. The installation procedures and the dialog boxes shown differ depending on the operating system.
-
 1
1 -
2
-
3
-
4
-
5
-
6
-
7
-
8
-
9
-
10
-
11
-
12
-
13
-
14
-
15
-
16
-
17
-
18
-
19
-
20
-
21
-
22
-
23
-
24
-
25
-
26
-
27
-
28
-
29
-
30
-
31
-
32
-
33
-
34
-
35
-
36
-
37
-
38
-
39
-
40
-
41
-
42
-
43
-
44
-
45
-
46
-
47
-
48
-
49
-
50
-
51
-
52
-
53
-
54
-
55
-
56
-
57
-
58
-
59
-
60
-
61
-
62
-
63
-
64
-
 65
65 -
 66
66 -
 67
67 -
 68
68 -
 69
69 -
 70
70 -
 71
71 -
 72
72 -
 73
73 -
 74
74 -
 75
75 -
76
-
77
-
78
-
79
-
80
-
81
-
82
-
83
-
84
-
85
-
86
-
87
-
88
-
89
-
90
-
91
-
92
-
93
-
94
-
95
-
96
-
97
-
98
-
99
-
100
-
101
-
102
-
103
-
104
-
105
-
106
-
107
-
108
-
109
 |
 |
