Sony DPP-F700 Operating Instructions - Page 97
Cleaning, with the no-imprint side, facing up. - cartridge
 |
UPC - 027242776197
View all Sony DPP-F700 manuals
Add to My Manuals
Save this manual to your list of manuals |
Page 97 highlights
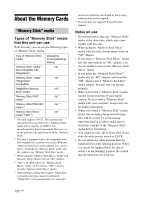
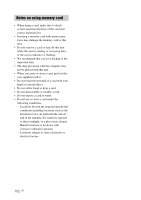
Cleaning If white lines or period-like dots are printed on the pictures, the thermal transfer head may be soiled with the dust accumulated inside this unit. Clean inside this unit using the supplied cleaning cartridge and sheet. Before you start cleaning this unit, please remove any memory cards or USB cables from this unit. 1 Open the ink ribbon compartment door and if there is an ink ribbon inserted, remove it. 2 Insert the supplied cleaning cartridge into this unit and close the ink ribbon compartment door. 5 Set the paper tray into this unit and press PRINT. The cleaning cartridge and cleaning sheet will clean inside this unit. After the cleaning is finished, the cleaning sheet is automatically ejected. 6 Remove the cleaning cartridge and sheet from this unit. Tips • Keep the cleaning cartridge and cleaning sheet together for future cleaning. Be careful not to lose them. Notes • If you already enjoy proper printing performances, cleaning will not improve the printed picture quality. • Do not place the cleaning sheet on top of print paper and carry out cleaning, as this may cause a paper jam or other troubles. • If a cleaning does not improve printed picture quality, please carry out the cleaning process a couple of times. • You cannot clean this unit while it is connected to a computer. 3 Remove the paper tray from this unit. If there is print paper in the tray, remove it. 4 Place the cleaning sheet into the paper tray with the no-imprint side facing up. Cleaning sheet If the paper jams Cleaning 97 GB
-
 1
1 -
2
-
3
-
4
-
5
-
6
-
7
-
8
-
9
-
10
-
11
-
12
-
13
-
14
-
15
-
16
-
17
-
18
-
19
-
20
-
21
-
22
-
23
-
24
-
25
-
26
-
27
-
28
-
29
-
30
-
31
-
32
-
33
-
34
-
35
-
36
-
37
-
38
-
39
-
40
-
41
-
42
-
43
-
44
-
45
-
46
-
47
-
48
-
49
-
50
-
51
-
52
-
53
-
54
-
55
-
56
-
57
-
58
-
59
-
60
-
61
-
62
-
63
-
64
-
65
-
66
-
67
-
68
-
69
-
70
-
71
-
72
-
73
-
74
-
75
-
76
-
77
-
78
-
79
-
80
-
81
-
82
-
83
-
84
-
85
-
86
-
87
-
88
-
89
-
90
-
91
-
 92
92 -
 93
93 -
 94
94 -
 95
95 -
 96
96 -
 97
97 -
 98
98 -
 99
99 -
 100
100 -
 101
101 -
 102
102 -
103
-
104
-
105
-
106
-
107
-
108
-
109
 |
 |