Sony DPT-S1 Operating Instructions - Page 61
Other than case A to D: Manually, connecting to an unlisted access point - root
 |
View all Sony DPT-S1 manuals
Add to My Manuals
Save this manual to your list of manuals |
Page 61 highlights
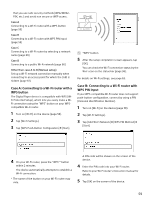
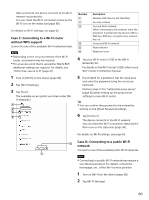
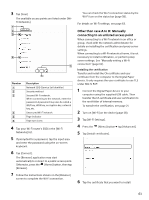
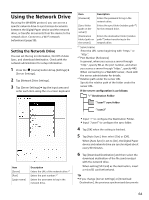
3 Tap [Scan] The available access points are listed under [WiFi Networks]. You can check the Wi-Fi connection status by the Wi-Fi icon on the status bar (page 58). For details on Wi-Fi settings, see page 63. Number Description Network SSID (Service Set Identifier) Security method Secured Wi-Fi network. When connecting to the network, enter the password. A password may also be called a WEP key, WPA key, encryption key, network key, etc. Unsecured Wi-Fi network Page indicator Page turn icons 4 Tap your Wi-Fi router's SSID in the [Wi-Fi Networks] list. 5 If prompted for a password, tap the input area and enter the password using the on-screen keyboard. 6 Tap [Connect]. The [Browser] application may start automatically to connect to a public access point. Otherwise, press the (Home) button, then tap [Browser]. 7 Follow the instructions shown on the [Browser] screen to complete the Wi-Fi connection. Other than case A to D: Manually connecting to an unlisted access point When connecting to a Wi-Fi network in an office or group, check with the network administrator for details on installing the certification and proxy server settings. When connecting to a Wi-Fi network at home, it is not necessary to install certification, or perform proxy server settings. See "Manually setting a Wi-Fi connection" (page 62). Installing the certification Transfer and install the CA certificate and user certificate from the computer to the Digital Paper device. It only requires the user certificate to use TLS under 802.1x EAP. 1 Connect the Digital Paper device to your computer using the supplied USB cable. Then transfer the CA certificate and user certification to the root folder of internal memory. To transfer the certification, see page 21. 2 Turn on [Wi-Fi] on the device (page 58). 3 Tap [Wi-Fi Settings]. 4 Press the (Menu) button tap [Advanced]. 5 Tap [Install certificates]. 6 Tap the certificate that you want to install. 61
-
 1
1 -
2
-
3
-
4
-
5
-
6
-
7
-
8
-
9
-
10
-
11
-
12
-
13
-
14
-
15
-
16
-
17
-
18
-
19
-
20
-
21
-
22
-
23
-
24
-
25
-
26
-
27
-
28
-
29
-
30
-
31
-
32
-
33
-
34
-
35
-
36
-
37
-
38
-
39
-
40
-
41
-
42
-
43
-
44
-
45
-
46
-
47
-
48
-
49
-
50
-
51
-
52
-
53
-
54
-
55
-
 56
56 -
 57
57 -
 58
58 -
 59
59 -
 60
60 -
 61
61 -
 62
62 -
 63
63 -
 64
64 -
 65
65 -
 66
66 -
67
-
68
-
69
-
70
-
71
-
72
-
73
-
74
-
75
-
76
-
77
-
78
-
79
-
80
-
81
-
82
-
83
-
84
-
85
-
86
-
87
-
88
-
89
 |
 |
