Sony DSC-H3/B Cyber-shot® Handbook - Page 45
ISO: Selecting a luminous sensitivity, EV: Adjusting the light intensity, Using the shooting functions
 |
View all Sony DSC-H3/B manuals
Add to My Manuals
Save this manual to your list of manuals |
Page 45 highlights
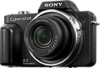
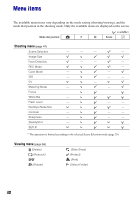
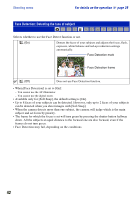
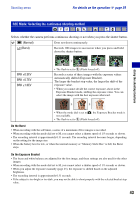
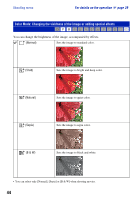
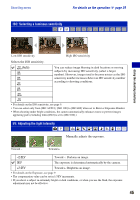
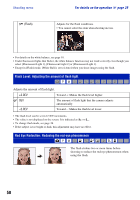
Shooting menu For details on the operation 1 page 39 ISO: Selecting a luminous sensitivity Using the shooting functions Low ISO sensitivity Selects the ISO sensitivity. (Auto) High ISO sensitivity You can reduce image blurring in dark locations or moving subjects by increasing ISO sensitivity (select a larger number). However, images tend to become noisier as the ISO sensitivity number increases.Select an ISO sensitivity number according to shooting conditions. • For details on the ISO sensitivity, see page 9. • You can select only from [ISO AUTO], [ISO 100] to [ISO 400] when set to Burst or Exposure Bracket. • When shooting under bright conditions, the camera automatically enhances tones to prevent images appearing pale (excluding when [ISO] is set to [ISO 100].). EV: Adjusting the light intensity Manually adjusts the exposure. Toward - Toward + -2.0EV Toward -: Darkens an image. 0EV The exposure is determined automatically by the camera. +2.0EV Toward +: Brightens an image. • For details on the Exposure, see page 9. • The compensation value can be set in 1/3EV increments. • If you shoot a subject in extremely bright or dark conditions, or when you use the flash, the exposure adjustment may not be effective. 45
-
 1
1 -
2
-
3
-
4
-
5
-
6
-
7
-
8
-
9
-
10
-
11
-
12
-
13
-
14
-
15
-
16
-
17
-
18
-
19
-
20
-
21
-
22
-
23
-
24
-
25
-
26
-
27
-
28
-
29
-
30
-
31
-
32
-
33
-
34
-
35
-
36
-
37
-
38
-
39
-
 40
40 -
 41
41 -
 42
42 -
 43
43 -
 44
44 -
 45
45 -
 46
46 -
 47
47 -
 48
48 -
 49
49 -
 50
50 -
51
-
52
-
53
-
54
-
55
-
56
-
57
-
58
-
59
-
60
-
61
-
62
-
63
-
64
-
65
-
66
-
67
-
68
-
69
-
70
-
71
-
72
-
73
-
74
-
75
-
76
-
77
-
78
-
79
-
80
-
81
-
82
-
83
-
84
-
85
-
86
-
87
-
88
-
89
-
90
-
91
-
92
-
93
-
94
-
95
-
96
-
97
-
98
-
99
-
100
-
101
-
102
-
103
-
104
-
105
-
106
-
107
-
108
-
109
-
110
-
111
-
112
-
113
-
114
-
115
-
116
-
117
-
118
-
119
-
120
-
121
-
122
-
123
 |
 |