Sony DSC V3 Operating Instructions - Page 97
Enjoing movies, Indicators during shooting, Shooting close-ups Macro, Using the self-timer
 |
UPC - 027242662155
View all Sony DSC V3 manuals
Add to My Manuals
Save this manual to your list of manuals |
Page 97 highlights
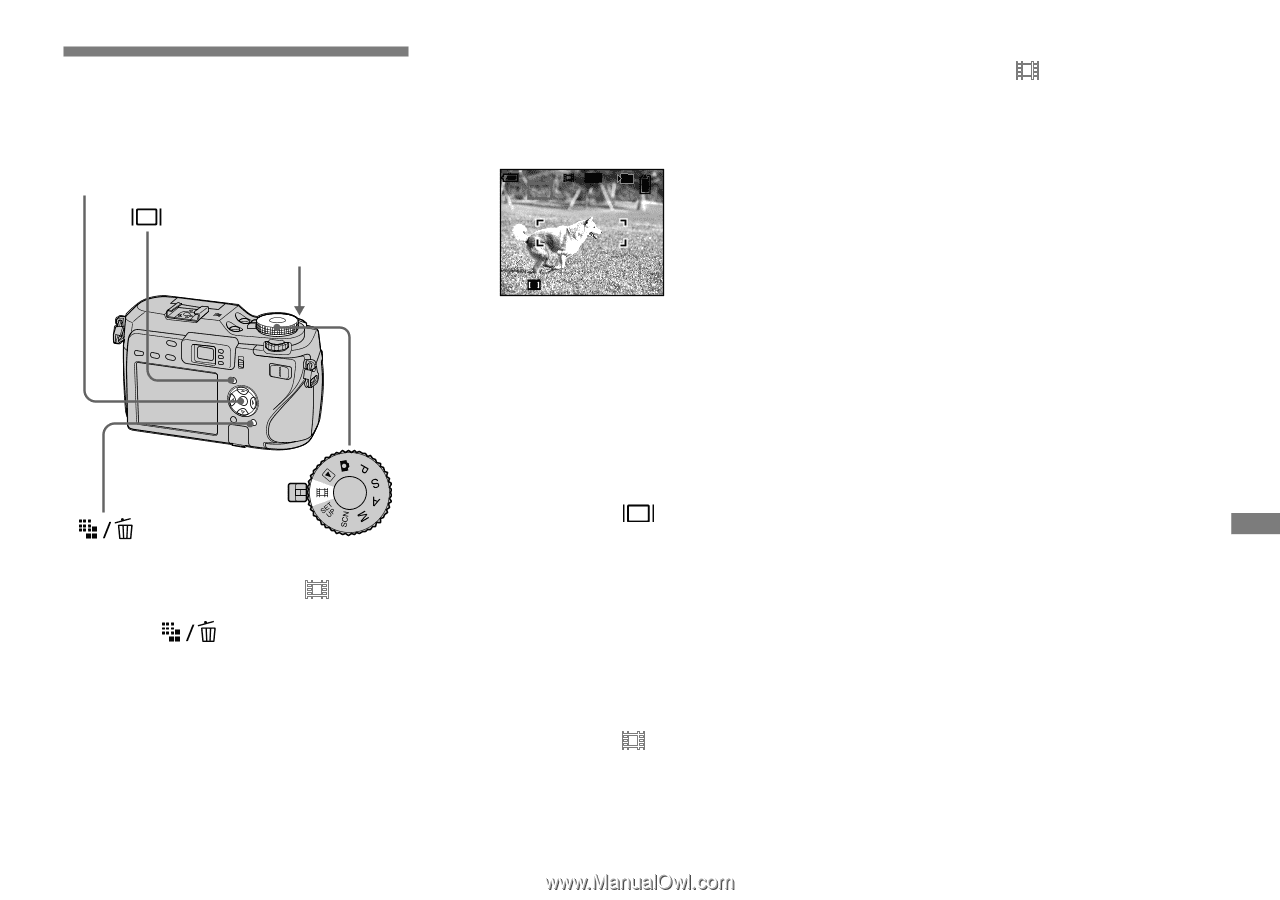
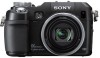
Shooting movies You can shoot movies with sound using your camera. Control button Shutter button Mode dial Set the mode dial to . Press (Image Size). The Image Size setup appears. Select the desired size with /. You can choose from [640(Fine)], [640(Standard)] and [160]. • [640(Fine)] can be recorded only on "Memory Stick PRO". Press the shutter button fully down. "REC" appears on the screen and the camera starts recording the image and sound. 60min STD 640 101 REC 00:00:02[00:10:48] • Recording stops when the recording medium is full. Press the shutter button fully down again to stop recording. Indicators during shooting The screen indicators are not recorded. Each time you press , the status of the LCD screen changes as follows: Indicators off LCD screen off Indicators on. A histogram is not displayed. For a detailed description of the indicators, see page 150. Shooting close-ups (Macro) Set the mode dial to and follow the procedure on page 33. Using the self-timer Set the mode dial to and follow the procedure on page 34. • When you set the image size to [640(Fine)] while connecting the A/V connecting cable to the A/V (MONO) jack, the subject does not appear on the LCD screen. The LCD screen turns blue. • You cannot use the following functions during shooting movies: − Changing the zoom scale − Flash − Inserting the date and time • For the recording time in each movie mode, see pages 134, 135. 97 Enjoying movies
-
 1
1 -
2
-
3
-
4
-
5
-
6
-
7
-
8
-
9
-
10
-
11
-
12
-
13
-
14
-
15
-
16
-
17
-
18
-
19
-
20
-
21
-
22
-
23
-
24
-
25
-
26
-
27
-
28
-
29
-
30
-
31
-
32
-
33
-
34
-
35
-
36
-
37
-
38
-
39
-
40
-
41
-
42
-
43
-
44
-
45
-
46
-
47
-
48
-
49
-
50
-
51
-
52
-
53
-
54
-
55
-
56
-
57
-
58
-
59
-
60
-
61
-
62
-
63
-
64
-
65
-
66
-
67
-
68
-
69
-
70
-
71
-
72
-
73
-
74
-
75
-
76
-
77
-
78
-
79
-
80
-
81
-
82
-
83
-
84
-
85
-
86
-
87
-
88
-
89
-
90
-
91
-
 92
92 -
 93
93 -
 94
94 -
 95
95 -
 96
96 -
 97
97 -
 98
98 -
 99
99 -
 100
100 -
 101
101 -
 102
102 -
103
-
104
-
105
-
106
-
107
-
108
-
109
-
110
-
111
-
112
-
113
-
114
-
115
-
116
-
117
-
118
-
119
-
120
-
121
-
122
-
123
-
124
-
125
-
126
-
127
-
128
-
129
-
130
-
131
-
132
-
133
-
134
-
135
-
136
-
137
-
138
-
139
-
140
-
141
-
142
-
143
-
144
-
145
-
146
-
147
-
148
-
149
-
150
-
151
-
152
-
153
-
154
-
155
-
156
 |
 |