Sony DSLR A100 User Guide - Page 109
Stage 3-B: Copying images to a, Computer, Click [Finish].
 |
UPC - 027242694156
View all Sony DSLR A100 manuals
Add to My Manuals
Save this manual to your list of manuals |
Page 109 highlights
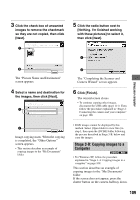
3 Click the check box of unwanted images to remove the checkmark so they are not copied, then click [Next]. 1 5 Click the radio button next to [Nothing. I'm finished working with these pictures] to select it, then click [Next]. 1 Using your computer 2 The "Picture Name and Destination" screen appears. 4 Select a name and destination for the images, then click [Next]. 1 2 The "Completing the Scanner and Camera Wizard" screen appears. 6 Click [Finish]. The wizard screen closes. • To continue copying other images, disconnect the USB cable (page 111). Then follow the procedure explained in "Stage 2: Connecting the camera and your computer" on page 108. 2 Image copying starts. When the copying is completed, the "Other Options" screen appears. • This section describes an example of copying images to the "My Documents" folder. • RAW images cannot be displayed by this method. Select [Open folder to view files] in step 1, then open the [DCIM] folder following the process described in Stage 3-B, below and copy the images. Stage 3-B: Copying images to a Computer • For Windows XP, follow the procedure explained in "Stage 3-A: Copying images to a computer" on page 108. This section describes an example of copying images to the "My Documents" folder. If the screen does not appear, press the shutter button on the camera halfway down. 109
-
 1
1 -
2
-
3
-
4
-
5
-
6
-
7
-
8
-
9
-
10
-
11
-
12
-
13
-
14
-
15
-
16
-
17
-
18
-
19
-
20
-
21
-
22
-
23
-
24
-
25
-
26
-
27
-
28
-
29
-
30
-
31
-
32
-
33
-
34
-
35
-
36
-
37
-
38
-
39
-
40
-
41
-
42
-
43
-
44
-
45
-
46
-
47
-
48
-
49
-
50
-
51
-
52
-
53
-
54
-
55
-
56
-
57
-
58
-
59
-
60
-
61
-
62
-
63
-
64
-
65
-
66
-
67
-
68
-
69
-
70
-
71
-
72
-
73
-
74
-
75
-
76
-
77
-
78
-
79
-
80
-
81
-
82
-
83
-
84
-
85
-
86
-
87
-
88
-
89
-
90
-
91
-
92
-
93
-
94
-
95
-
96
-
97
-
98
-
99
-
100
-
101
-
102
-
103
-
 104
104 -
 105
105 -
 106
106 -
 107
107 -
 108
108 -
 109
109 -
 110
110 -
 111
111 -
 112
112 -
 113
113 -
 114
114 -
115
-
116
-
117
-
118
-
119
-
120
-
121
-
122
-
123
-
124
-
125
-
126
-
127
-
128
-
129
-
130
-
131
-
132
-
133
-
134
-
135
-
136
-
137
-
138
-
139
-
140
-
141
-
142
-
143
-
144
-
145
-
146
-
147
-
148
-
149
-
150
-
151
-
152
-
153
-
154
-
155
-
156
-
157
-
158
-
159
 |
 |
