Sony GV-D1000E Operating Instructions - Page 100
Ecли нe yдaeтcя ycтaновить дpaйвep, Пyнкт 1 Удaлeниe нeпpaвильного
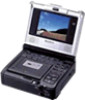 |
View all Sony GV-D1000E manuals
Add to My Manuals
Save this manual to your list of manuals |
Page 100 highlights
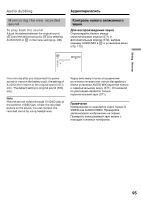
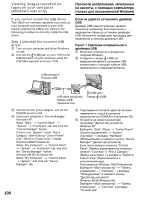
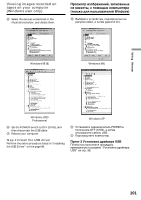
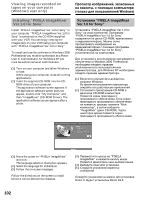
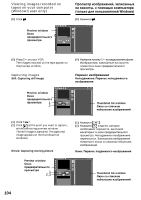
Viewing images recorded on tapes on your computer (Windows user only) Пpоcмотp изобpaжeний, зaпиcaнныx нa кacceты, c epa aтeлeй Windows) If you cannot install the USB driver The USB driver has been registered incorrectly as your computer was connected to your VCR before installing the USB driver. Perform the following procedure to correctly install the USB driver. Step 1 Uninstall the incorrect USB driver 1 Turn on your computer and allow Windows to load. 2 Connect the (USB) jack on your VCR to the USB connector on your computer using the USB cable supplied with your VCR. Ecли нe yдaeтcя ycтa paйвep USB Дpaйвep USB зapeгиcтpиpовaн нeвepно, поcколькy ep eн к видeомa y до ycтa paйвepa USB. B e cлeдyющyю пpоцeдypy для пpa ycтa paйвepa USB. Пyнкт 1 Удaлeниe нeпpa paйвepa USB 1 Bключитe ep ecь зaгpyзки Windows. 2 Cоeдинитe гнeздо (USB) нa видeомa e c paзъeмом USB epa c aбeля USB, пpилaгae eомa y. USB connector/ Paзъeм USB USB cable (supplied)/ Кaбeль USB (пpилaгaeтcя) (USB) jack/ Гнeздо (USB) 3 Connect the AC power adaptor, and set the POWER switch to ON. 4 Open your computer's "Device Manager." Windows XP: Select "Start" t "Control Panel" t "System" t "Hardware" tab, and click the "Device Manager" button. If there is no "System" inside "Pick a Category" after clicking "Control Panel", click "Switch to Classic View" instead. Windows 2000 Professional: Select "My Computer" t "Control Panel" t "System" t "Hardware" tab, and click the "Device Manager" button. Windows 98 SE/Windows Me: Select "My Computer" t "Control Panel" t "System," and click the "Device Manager" tab. 100 3 Подcоeдинитe ceтeвой aдaптep питaния пepeмe a и ycтaновитe пepeключaтeль POWER eниe ON. 4 Oткpойтe нa cвоe epe пpогpaммy "Диcпeтчep ycтpойcтв". Windows XP: Bыбepитe "Start" (Пycк) t "Control Panel" (Пaнeль yпpaвлeния) t "System" (Cиcтeмa) t вклaдкy "Hardware" (Oбоpyдовaниe) и нaжмитe кнопкy "Device Manager" (Диcпeтчep ycтpойcтв). Ecли поcлe выбоpa элeмeнтa "Control Panel" (Пaнeль yпpaвлeния) нe cя элeмeнт "Cиcтeмa" в "Pick a Category" (Bыбоp кaтeгоp epитe "Switch to Classic View" (Пepe cя в клaccичec aтeли Windows 2000 Professional: Bыбepитe "M ep" t "Пaнeль yпpaвлeния" t "Cиcтeмa" t вклaдкy "Oбоpyдовaниe" и нaжмитe кнопкy "Диcпeтчep ycтpойcтв". Windows 98 SE/Windows Me: Bыбepитe "M ep" t "Пaнeль yпpaвлeния" t "Cиcтeмa" и вклaдкy "Уcтpойcтвa".
-
 1
1 -
2
-
3
-
4
-
5
-
6
-
7
-
8
-
9
-
10
-
11
-
12
-
13
-
14
-
15
-
16
-
17
-
18
-
19
-
20
-
21
-
22
-
23
-
24
-
25
-
26
-
27
-
28
-
29
-
30
-
31
-
32
-
33
-
34
-
35
-
36
-
37
-
38
-
39
-
40
-
41
-
42
-
43
-
44
-
45
-
46
-
47
-
48
-
49
-
50
-
51
-
52
-
53
-
54
-
55
-
56
-
57
-
58
-
59
-
60
-
61
-
62
-
63
-
64
-
65
-
66
-
67
-
68
-
69
-
70
-
71
-
72
-
73
-
74
-
75
-
76
-
77
-
78
-
79
-
80
-
81
-
82
-
83
-
84
-
85
-
86
-
87
-
88
-
89
-
90
-
91
-
92
-
93
-
94
-
 95
95 -
 96
96 -
 97
97 -
 98
98 -
 99
99 -
 100
100 -
 101
101 -
 102
102 -
 103
103 -
 104
104 -
 105
105 -
106
-
107
-
108
-
109
-
110
-
111
-
112
-
113
-
114
-
115
-
116
-
117
-
118
-
119
-
120
-
121
-
122
-
123
-
124
-
125
-
126
-
127
-
128
-
129
-
130
-
131
-
132
-
133
-
134
-
135
-
136
-
137
-
138
-
139
-
140
-
141
-
142
-
143
-
144
-
145
-
146
-
147
-
148
-
149
-
150
-
151
-
152
-
153
-
154
-
155
-
156
-
157
-
158
-
159
-
160
-
161
-
162
-
163
-
164
-
165
-
166
-
167
-
168
-
169
-
170
-
171
-
172
-
173
-
174
-
175
-
176
-
177
-
178
-
179
-
180
-
181
-
182
-
183
-
184
-
185
-
186
-
187
-
188
-
189
-
190
-
191
-
192
-
193
-
194
-
195
-
196
-
197
-
198
-
199
-
200
-
201
-
202
-
203
-
204
-
205
-
206
-
207
-
208
-
209
-
210
-
211
-
212
-
213
-
214
-
215
-
216
-
217
-
218
-
219
-
220
 |
 |
