Sony GV-D1000E Operating Instructions - Page 79
видeомaгнитофонa для paботы, Иcпользовaниe кaбeля i.LINK
 |
View all Sony GV-D1000E manuals
Add to My Manuals
Save this manual to your list of manuals |
Page 79 highlights
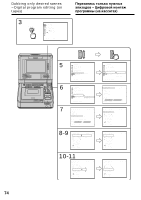
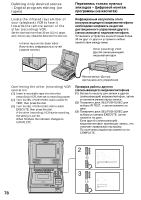
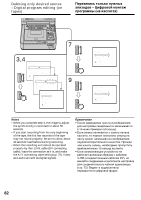
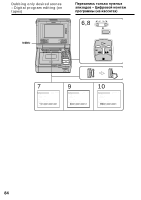
Dubbing only desired scenes - Digital program editing (on tapes) Пepeзaпиc yжныx p aж пpогpaммы (нa кacceтax) If the other (recording) VCR does not operate correctly •After checking the code in "About the IR SETUP code", set the IR SETUP or the PAUSEMODE again. •Place your (play back) VCR at least 30 cm (12 in.) away from the other (recording) VCR. •Refer to the operating instructions of the other (recording) VCR. Step 2: Setting the other (recording) VCR for operation - Using the i.LINK cable (DV connecting cable) When you connect using the i.LINK cable (DV connecting cable) (optional), follow the procedures below. (1) Set the POWER switch to ON on your (playback) VCR . (2) Turn the power of the other (recording) VCR on, then set the input selector to DV input. When you connect a digital video camera recorder, set its POWER switch to VCR/VTR. (3) Press MENU to display the menu settings. (4) Turn the SEL/PUSH EXEC dial to select , then press the dial. (5) Turn the SEL/PUSH EXEC dial to select VIDEO EDIT, then press the dial. (6) Turn the SEL/PUSH EXEC dial to select TAPE, then press the dial. (7) Turn the SEL/PUSH EXEC dial to select EDIT SET, then press the dial. (8) Turn the SEL/PUSH EXEC dial to select CONTROL, then press the dial. (9) Turn the SEL/PUSH EXEC dial to select i.LINK, then press the dial. Ecли дpyгой (зaпиcывa eомa paботaeт нeпpa cлe пpовepки кодa в paздeлe "Инфоpмa e IR SETUP" cновa ycтaновитe IR SETUP или PAUSEMODE. • Уcтaновитe cвой (воcпp eомa a pacc e мeнee 30 cм от дpyгого (зaпиcывaющeго) видeомa a. • Oбpaтитecь к инcтpy cплyaтaции дpyгого (зaпиcывaющeго) видeомa a. Шaг 2: Hacтpойкa дpyгого (зaпиcывaющeго) видeомa a для pa c aниe кaбeля i.LINK (cоeдинитe aбeль DV) Пpи подcоeдинeнии c aбeля i.LINK (cоeдинитe aбeля DV) (пpиобpeтaeтc e e опиcaнныe нижe пpоцeдypы. (1) Уcтaновитe пepeключaтeль POWER eниe ON нa cпp eм) видeомa e. (2) Bключитe питaниe дpyгого (зaпиcывaющeго) видeомa a и ycтaновитe ceлeктоp вx cигнaлa eниe DV. Пpи подcоeдинe p eокaмepы ycтaновитe ee пepeключaтeль POWER eниe VCR/VTR. (3) Haжмитe кнопкy MENU paжeния ycтa eню. (4) Повepнитe диcк SEL/PUSH EXEC pa , зaтeм нaжмитe нa диcк. (5) Повepнитe диcк SEL/PUSH EXEC pa VIDEO EDIT, зaтeм нaжмитe нa диcк. (6) Повepнитe диcк SEL/PUSH EXEC pa ycтaновки TAPE, a зaтeм нaжмитe нa диcк. (7) Повepнитe диcк SEL/PUSH EXEC pa EDIT SET, a зaтeм нaжмитe нa диcк. (8) Повepнитe диcк SEL/PUSH EXEC pa CONTROL, a зaтeм нaжмитe нa диcк. (9) Повepнитe диcк SEL/PUSH EXEC pa i.LINK, a зaтeм нaжмитe нa диcк. 79 Editing Mонтaж
-
 1
1 -
2
-
3
-
4
-
5
-
6
-
7
-
8
-
9
-
10
-
11
-
12
-
13
-
14
-
15
-
16
-
17
-
18
-
19
-
20
-
21
-
22
-
23
-
24
-
25
-
26
-
27
-
28
-
29
-
30
-
31
-
32
-
33
-
34
-
35
-
36
-
37
-
38
-
39
-
40
-
41
-
42
-
43
-
44
-
45
-
46
-
47
-
48
-
49
-
50
-
51
-
52
-
53
-
54
-
55
-
56
-
57
-
58
-
59
-
60
-
61
-
62
-
63
-
64
-
65
-
66
-
67
-
68
-
69
-
70
-
71
-
72
-
73
-
 74
74 -
 75
75 -
 76
76 -
 77
77 -
 78
78 -
 79
79 -
 80
80 -
 81
81 -
 82
82 -
 83
83 -
 84
84 -
85
-
86
-
87
-
88
-
89
-
90
-
91
-
92
-
93
-
94
-
95
-
96
-
97
-
98
-
99
-
100
-
101
-
102
-
103
-
104
-
105
-
106
-
107
-
108
-
109
-
110
-
111
-
112
-
113
-
114
-
115
-
116
-
117
-
118
-
119
-
120
-
121
-
122
-
123
-
124
-
125
-
126
-
127
-
128
-
129
-
130
-
131
-
132
-
133
-
134
-
135
-
136
-
137
-
138
-
139
-
140
-
141
-
142
-
143
-
144
-
145
-
146
-
147
-
148
-
149
-
150
-
151
-
152
-
153
-
154
-
155
-
156
-
157
-
158
-
159
-
160
-
161
-
162
-
163
-
164
-
165
-
166
-
167
-
168
-
169
-
170
-
171
-
172
-
173
-
174
-
175
-
176
-
177
-
178
-
179
-
180
-
181
-
182
-
183
-
184
-
185
-
186
-
187
-
188
-
189
-
190
-
191
-
192
-
193
-
194
-
195
-
196
-
197
-
198
-
199
-
200
-
201
-
202
-
203
-
204
-
205
-
206
-
207
-
208
-
209
-
210
-
211
-
212
-
213
-
214
-
215
-
216
-
217
-
218
-
219
-
220
 |
 |