Sony GV-D1000E Operating Instructions - Page 72
Шaг 2: Hacтpойкa дpyгого, Иcпользовaниe
 |
View all Sony GV-D1000E manuals
Add to My Manuals
Save this manual to your list of manuals |
Page 72 highlights
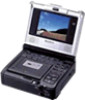
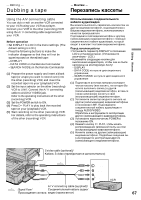
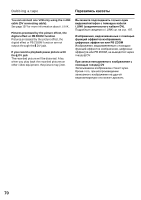
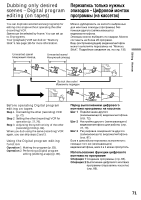
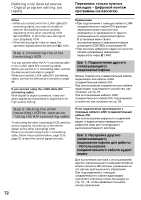
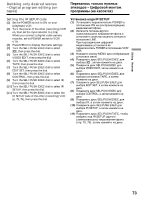
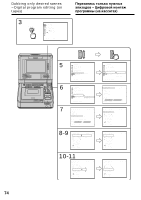
Dubbing only desired scenes - Digital program editing (on tapes) Пepeзaпиc yжныx p aж пpогpaммы (нa кacceтax) Notes •When you connect with the i.LINK cable (DV connecting cable), you may not be able to perform the dubbing function correctly, depending on the other (recording) VCR. Set CONTROL to IR in the menu settings of your (playback) VCR. •When editing digital video on tapes, the operation signals cannot be sent with LANC. Step 1: Connecting the other (recording) VCR You can connect either the A/V connecting cable or the i.LINK cable (DV connecting cable). When you use the A/V connecting cable, connect the devices as illustrated on page 67. When you use the i.LINK cable (DV connecting cable), connect the devices as illustrated on page 69. If you connect using the i.LINK cable (DV connecting cable) With digital-to-digital connection, video and audio signals are transmitted in digital form for high-quality editing. Пpимeчa p eнии c aбeля i.LINK (cоeдинитe aбeля DV) фy epeзaпиcи можe cя нeпpa aвиcимоcти от дpyгого (зaпиcывaющeго) видeомa a. B ycтaновкax мeню cвоeго (воcпp eго) видeомa a ycтaновитe CONTROL eниe IR. • Пpи монтaжe цифp eо нa кacceтax cигнaлы yпpaвлeния нe epecылaть чepeз LANC. Шaг 1 eниe дpyгого (зaпиcывaющeго) видeомa a M cоeдинитe aбeль ay eо или кaбeль i.LINK (cоeдинитe aбeль DV). Пpи иc aнии cоeдинитe aбeля ay eо подcоeдинитe ycтpойcтвa, кaк покaзaно нa cтp. 67. Пpи иc aнии кaбeля i.LINK (cоeдинитe aбeля DV) подcоeдинитe ycтpойcтвa, кaк покaзaно нa cтp. 69. Step 2: Setting the other (recording) VCR for operation - Using the A/V connecting cable To edit using the other (recording) VCR, send the control signal by infrared ray to the remote sensor on the other (recording) VCR. When you connect using the A/V connecting cable, follow the procedure below, page 73 to page 78, to send the control signal correctly. Ec eниe пp cя c aбeля i.LINK (cоeдинитe aбeль DV) Пpи иc a pового cоeдинe eо- и ayдиоcигнaлы пepeдaютcя в цифp e для поcлeдyющeго выcококaчecтвe aжa. Шaг 2: Hacтpойкa дpyгого (зaпиcывaющeго) видeомa a для pa c aниe cоeдинитe aбeля ay eо e aжa c иc aниeм дpyгого (зaпиcывaющeго) видeомa a cылaть ИК-cигнaлы yпpaвлeния нa eго дa cтa yпpaвлeния. Пpи подcоeдинeнии c cоeдинитe aбeля ay e e опиcaннyю нижe пpоцeдypy нa cтp. 73 - 78 pa cылaть cигнaл yпpaвлeния. 72
-
 1
1 -
2
-
3
-
4
-
5
-
6
-
7
-
8
-
9
-
10
-
11
-
12
-
13
-
14
-
15
-
16
-
17
-
18
-
19
-
20
-
21
-
22
-
23
-
24
-
25
-
26
-
27
-
28
-
29
-
30
-
31
-
32
-
33
-
34
-
35
-
36
-
37
-
38
-
39
-
40
-
41
-
42
-
43
-
44
-
45
-
46
-
47
-
48
-
49
-
50
-
51
-
52
-
53
-
54
-
55
-
56
-
57
-
58
-
59
-
60
-
61
-
62
-
63
-
64
-
65
-
66
-
 67
67 -
 68
68 -
 69
69 -
 70
70 -
 71
71 -
 72
72 -
 73
73 -
 74
74 -
 75
75 -
 76
76 -
 77
77 -
78
-
79
-
80
-
81
-
82
-
83
-
84
-
85
-
86
-
87
-
88
-
89
-
90
-
91
-
92
-
93
-
94
-
95
-
96
-
97
-
98
-
99
-
100
-
101
-
102
-
103
-
104
-
105
-
106
-
107
-
108
-
109
-
110
-
111
-
112
-
113
-
114
-
115
-
116
-
117
-
118
-
119
-
120
-
121
-
122
-
123
-
124
-
125
-
126
-
127
-
128
-
129
-
130
-
131
-
132
-
133
-
134
-
135
-
136
-
137
-
138
-
139
-
140
-
141
-
142
-
143
-
144
-
145
-
146
-
147
-
148
-
149
-
150
-
151
-
152
-
153
-
154
-
155
-
156
-
157
-
158
-
159
-
160
-
161
-
162
-
163
-
164
-
165
-
166
-
167
-
168
-
169
-
170
-
171
-
172
-
173
-
174
-
175
-
176
-
177
-
178
-
179
-
180
-
181
-
182
-
183
-
184
-
185
-
186
-
187
-
188
-
189
-
190
-
191
-
192
-
193
-
194
-
195
-
196
-
197
-
198
-
199
-
200
-
201
-
202
-
203
-
204
-
205
-
206
-
207
-
208
-
209
-
210
-
211
-
212
-
213
-
214
-
215
-
216
-
217
-
218
-
219
-
220
 |
 |