Sony HDR-AS50R Help Guide - Page 76
Importing the BGM
 |
View all Sony HDR-AS50R manuals
Add to My Manuals
Save this manual to your list of manuals |
Page 76 highlights
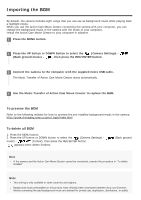
Importing the BGM By default, the camera includes eight songs that you can use as background music while playing back a highlight movie. When you use the Action Cam Movie Creator connecting the camera with your computer, you can replace the background music of the camera with the music of your computer. Install the Action Cam Movie Creator to your computer in advance. 1 Press the MENU button. 2 Press the UP button or DOWN button to select the (Camera Settings) - (Back ground music) - , then press the REC/ENTER button. 3 Connect the camera to the computer with the supplied micro USB cable. The Music Transfer of Action Cam Movie Creator starts automatically. 4 Use the Music Transfer of Action Cam Movie Creator to replace the BGM. To preview the BGM Refer to the following website for how to preview the pre-installed background music in the camera. http://guide.d-imaging.sony.co.jp/mt_bgm/index.html To delete all BGM 1. Press the MENU button. 2. Press the UP button or DOWN button to select the (Camera Settings) - music) - (format), then press the REC/ENTER button. appears when delete finishes. (Back ground Hint If the camera and the Action Cam Movie Creator cannot be connected, execute the procedure in "To delete all BGM." Note This setting is only available in some countries and regions. Background music preinstalled on this product have officially been contracted between Sony and licensors. Movies containing the said background music are allowed for private use, duplication, distribution, or public
-
 1
1 -
2
-
3
-
4
-
5
-
6
-
7
-
8
-
9
-
10
-
11
-
12
-
13
-
14
-
15
-
16
-
17
-
18
-
19
-
20
-
21
-
22
-
23
-
24
-
25
-
26
-
27
-
28
-
29
-
30
-
31
-
32
-
33
-
34
-
35
-
36
-
37
-
38
-
39
-
40
-
41
-
42
-
43
-
44
-
45
-
46
-
47
-
48
-
49
-
50
-
51
-
52
-
53
-
54
-
55
-
56
-
57
-
58
-
59
-
60
-
61
-
62
-
63
-
64
-
65
-
66
-
67
-
68
-
69
-
70
-
 71
71 -
 72
72 -
 73
73 -
 74
74 -
 75
75 -
 76
76 -
 77
77 -
 78
78 -
 79
79 -
 80
80 -
 81
81 -
82
-
83
-
84
-
85
-
86
-
87
-
88
-
89
-
90
-
91
-
92
-
93
-
94
-
95
-
96
-
97
-
98
-
99
-
100
-
101
-
102
-
103
-
104
-
105
-
106
-
107
-
108
-
109
-
110
-
111
-
112
-
113
-
114
-
115
-
116
-
117
-
118
-
119
-
120
-
121
-
122
-
123
-
124
-
125
-
126
-
127
-
128
-
129
-
130
-
131
-
132
 |
 |
