Sony ILCE-7SM2 Help Guide Printable PDF - Page 235
Importing images to the computer
 |
View all Sony ILCE-7SM2 manuals
Add to My Manuals
Save this manual to your list of manuals |
Page 235 highlights
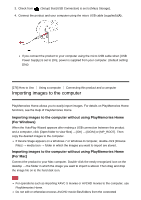
3. Check from (Setup) that [USB Connection] is set to [Mass Storage]. 4. Connect the product and your computer using the micro USB cable (supplied) (A) . If you connect the product to your computer using the micro USB cable when [USB Power Supply] is set to [On], power is supplied from your computer. (Default setting: [On]) [276] How to Use Using a computer Connecting this product and a computer Importing images to the computer PlayMemories Home allows you to easily import images. For details on PlayMemories Home functions, see the Help of PlayMemories Home. Importing images to the computer without using PlayMemories Home (For Windows) When the AutoPlay Wizard appears after making a USB connection between this product and a computer, click [Open folder to view files] → [OK] → [DCIM] or [MP_ROOT]. Then copy the desired images to the computer. If Device Stage appears on a Windows 7 or Windows 8 computer, double-click [Browse Files] → media icon → folder in which the images you want to import are stored. Importing images to the computer without using PlayMemories Home (For Mac) Connect the product to your Mac computer. Double-click the newly recognized icon on the desktop → the folder in which the image you want to import is stored. Then drag and drop the image file on to the hard disk icon. Note For operations such as importing XAVC S movies or AVCHD movies to the computer, use PlayMemories Home. Do not edit or otherwise process AVCHD movie files/folders from the connected
-
 1
1 -
2
-
3
-
4
-
5
-
6
-
7
-
8
-
9
-
10
-
11
-
12
-
13
-
14
-
15
-
16
-
17
-
18
-
19
-
20
-
21
-
22
-
23
-
24
-
25
-
26
-
27
-
28
-
29
-
30
-
31
-
32
-
33
-
34
-
35
-
36
-
37
-
38
-
39
-
40
-
41
-
42
-
43
-
44
-
45
-
46
-
47
-
48
-
49
-
50
-
51
-
52
-
53
-
54
-
55
-
56
-
57
-
58
-
59
-
60
-
61
-
62
-
63
-
64
-
65
-
66
-
67
-
68
-
69
-
70
-
71
-
72
-
73
-
74
-
75
-
76
-
77
-
78
-
79
-
80
-
81
-
82
-
83
-
84
-
85
-
86
-
87
-
88
-
89
-
90
-
91
-
92
-
93
-
94
-
95
-
96
-
97
-
98
-
99
-
100
-
101
-
102
-
103
-
104
-
105
-
106
-
107
-
108
-
109
-
110
-
111
-
112
-
113
-
114
-
115
-
116
-
117
-
118
-
119
-
120
-
121
-
122
-
123
-
124
-
125
-
126
-
127
-
128
-
129
-
130
-
131
-
132
-
133
-
134
-
135
-
136
-
137
-
138
-
139
-
140
-
141
-
142
-
143
-
144
-
145
-
146
-
147
-
148
-
149
-
150
-
151
-
152
-
153
-
154
-
155
-
156
-
157
-
158
-
159
-
160
-
161
-
162
-
163
-
164
-
165
-
166
-
167
-
168
-
169
-
170
-
171
-
172
-
173
-
174
-
175
-
176
-
177
-
178
-
179
-
180
-
181
-
182
-
183
-
184
-
185
-
186
-
187
-
188
-
189
-
190
-
191
-
192
-
193
-
194
-
195
-
196
-
197
-
198
-
199
-
200
-
201
-
202
-
203
-
204
-
205
-
206
-
207
-
208
-
209
-
210
-
211
-
212
-
213
-
214
-
215
-
216
-
217
-
218
-
219
-
220
-
221
-
222
-
223
-
224
-
225
-
226
-
227
-
228
-
229
-
 230
230 -
 231
231 -
 232
232 -
 233
233 -
 234
234 -
 235
235 -
 236
236 -
 237
237 -
 238
238 -
 239
239 -
 240
240 -
241
-
242
-
243
-
244
-
245
-
246
-
247
-
248
-
249
-
250
-
251
-
252
-
253
-
254
-
255
-
256
-
257
-
258
-
259
-
260
-
261
-
262
-
263
-
264
-
265
-
266
-
267
-
268
-
269
-
270
-
271
-
272
-
273
-
274
-
275
-
276
-
277
-
278
-
279
-
280
-
281
-
282
-
283
-
284
-
285
-
286
-
287
-
288
-
289
-
290
-
291
 |
 |
