Sony KDL-32W600D Operating Instructions Setup Guide - Page 39
Using Audio and Video Equipment, Using Screen Mirroring, To use BRAVIA Sync devices
 |
View all Sony KDL-32W600D manuals
Add to My Manuals
Save this manual to your list of manuals |
Page 39 highlights
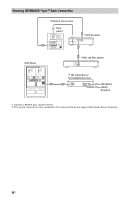
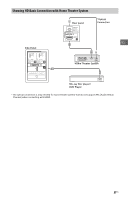
Using Audio and Video Equipment 1 Turn on the connected equipment. 2 Press INPUT to display the input source. 3 Press / then to select the desired input source. The highlighted item is selected if 5 seconds pass without any operation. Note • When connecting a digital audio system not compatible with Audio Return Channel (ARC) technology using an HDMI cable, you need to connect an optical audio cable to the DIGITAL AUDIO OUT (OPTICAL)* to output digital sound. • When connecting with an HDMI cable, be sure to use HighSpeed HDMI Cable with Cable Type Logo (Recommended SONY Cable). • When connecting mono equipment, connect the audio cable to the L (mono) jack. * Only on limited region/country/TV model. To use BRAVIA Sync devices When connecting the TV to BRAVIA Sync compatible equipment, you can control them together. Be sure to perform the necessary settings in advance. The BRAVIA Sync Control settings must be set on both the TV and the connected equipment. See [BRAVIA Sync Settings] (page 30) for the settings on the TV side. Refer to the connected equipment operating instructions for the settings on the connected equipment side. Using Screen Mirroring Screen mirroring displays the screen of a compatible device (e.g. smartphones) on your large TV screen by Miracast technology. No wireless router (or access point) is required to use this feature. 1 Press INPUT button, then select [Screen mirroring] using / US buttons. 2 Operate the Screen mirroring compatible device to connect with the TV. Once connected, the device screen will be displayed on the TV. To show connected devices/delete device When the waiting screen for the Screen mirroring is displayed, press OPTIONS, then select [Show Device List / Delete]. To deregister a device, select the device in the list to delete, press . Then, select [Yes] in the confirmation display. To display registration notification when attempting to connect a device with the TV Activating this function can avoid an unintended device from being connected. When the standby screen for Screen mirroring is displayed, press OPTIONS, then select [Registration Notification] t [On]. Note that once you decline registration request from a device, you will not be able to connect the device unless you delete it from the device list. To change the band setting (for experts) When the standby screen for Screen mirroring is displayed, press OPTIONS, then select [Band Setting]. Note • Connecting devices must conform to the following: - Screen mirroring compatible devices: 2.4GHz connection (5GHz not supported). • For information about the supported wireless band of your device, refer to the instruction manual of your device. 39US
-
 1
1 -
2
-
3
-
4
-
5
-
6
-
7
-
8
-
9
-
10
-
11
-
12
-
13
-
14
-
15
-
16
-
17
-
18
-
19
-
20
-
21
-
22
-
23
-
24
-
25
-
26
-
27
-
28
-
29
-
30
-
31
-
32
-
33
-
 34
34 -
 35
35 -
 36
36 -
 37
37 -
 38
38 -
 39
39 -
 40
40 -
 41
41 -
 42
42 -
 43
43 -
 44
44 -
45
-
46
-
47
-
48
-
49
-
50
-
51
-
52
-
53
-
54
-
55
-
56
-
57
-
58
-
59
-
60
-
61
-
62
-
63
-
64
-
65
-
66
-
67
-
68
-
69
-
70
-
71
-
72
-
73
-
74
-
75
-
76
-
77
-
78
-
79
-
80
-
81
-
82
-
83
-
84
-
85
-
86
-
87
-
88
-
89
-
90
-
91
-
92
-
93
-
94
-
95
-
96
-
97
-
98
-
99
-
100
-
101
-
102
-
103
-
104
 |
 |
