Sony KDL-46V25L1 Instructions - Page 10
Confirming the completion of the installation, Step 5, Installing the TV or monitor on
 |
View all Sony KDL-46V25L1 manuals
Add to My Manuals
Save this manual to your list of manuals |
Page 10 highlights
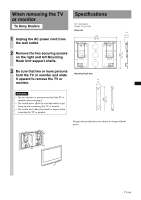
Step 5: Installing the TV or monitor on the Plate Unit (Continued) 6 Firmly tighten the securing screws screwed in temporarily in procedure 1. 3 Install the TV or monitor onto the Plate Unit. 1 Insert the screws (+B6×L20, supplied) into the screw holes on the outer left and right sides of the Mounting Hook Unit support shafts, and tighten them temporarily. Tighten the screws to halfway so that they do not protrude from the opposite side. Note If the temporarily attached screws protrude inside the Mounting Hook Unit support shafts, the lower hooks of the Mounting Hook Unit cannot be fitted in (procedure 4). 2 Hitch the upper hooks of the two Mounting Hook Units on to the support shafts of the arms. 3 Place the lower hooks of the two Mounting Hook Units so that they touch the front side of the Mounting Hook Unit support shafts. 4 Slightly push the TV or monitor toward the Plate Unit and upward, to hitch the lower hooks of the two Mounting Hook Units to the Mounting Hook Unit support shafts. 5 Confirm the eight hooks are firmly hooked on the four shafts on the Plate Unit. WARNING Be sure to tighten both left and right securing screws firmly. If you fail to do so, the TV or monitor may fall when it is pushed upward and cause injury. Confirming the completion of the installation Check the following points. • The eight hooks of the Mounting Hook Units are firmly hooked on the four shafts of the Plate Unit. • The cord and the cable are not twisted or pinched. • The two securing screws on the Mounting Hook Unit are securely tightened. WARNING Incomplete installation may cause the product falling and result in injury or product damage. Also, improper placement of the AC power cord, etc., may cause fire or electric shock through a short circuit. Be sure to confirm the completion of the installation for safety. Mounting Hook Units 10 (GB)
-
 1
1 -
2
-
3
-
4
-
 5
5 -
 6
6 -
 7
7 -
 8
8 -
 9
9 -
 10
10 -
 11
11 -
 12
12 -
 13
13 -
 14
14 -
 15
15 -
16
-
17
-
18
-
19
-
20
-
21
-
22
-
23
-
24
-
25
-
26
-
27
-
28
-
29
-
30
-
31
-
32
-
33
-
34
-
35
-
36
-
37
-
38
-
39
-
40
-
41
-
42
-
43
-
44
-
45
-
46
-
47
-
48
-
49
-
50
-
51
-
52
-
53
-
54
-
55
-
56
-
57
-
58
-
59
-
60
-
61
-
62
-
63
-
64
-
65
-
66
-
67
-
68
-
69
-
70
-
71
-
72
-
73
-
74
-
75
-
76
-
77
-
78
-
79
-
80
-
81
-
82
-
83
-
84
-
85
-
86
-
87
-
88
-
89
-
90
-
91
-
92
-
93
-
94
-
95
-
96
-
97
-
98
-
99
-
100
-
101
-
102
-
103
-
104
-
105
-
106
-
107
-
108
-
109
-
110
-
111
-
112
 |
 |
