Sony KDL-46V25L1 Instructions - Page 5
Step 1: Checking the parts required for the installation, not supplied. - power supply
 |
View all Sony KDL-46V25L1 manuals
Add to My Manuals
Save this manual to your list of manuals |
Page 5 highlights
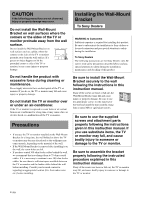
Be sure to tighten the screws securely in the designated position. If you fail to do so, the TV or monitor may fall, and cause bodily injury to someone or damage to the TV or monitor. Be careful not to subject the TV or monitor to shock during installation. If the TV or monitor is exposed to shock, it may fall or break apart. This may cause injury. Be sure to install the TV or monitor on a wall that is both perpendicular and flat. If you fail to do so, the TV or monitor may fall and cause injury. After proper installation of the TV or monitor, secure the cables properly. If people or objects get tangled with cables, this may result in injury or damage to the TV or monitor. Do not allow the AC power cord or the connecting cable to be pinched. If the AC power cord or the connecting cable is pinched between the unit and the wall or is bent or twisted by force, the internal conductors may become exposed and cause a short circuit or an electrical break. This may cause a fire or an electric shock. Be careful not to hurt your hands or fingers during the installation. Be careful not to hurt your hands or fingers when installing the Wall-Mount Bracket or the TV or monitor. The screws needed to secure the Wall-Mount Bracket to the wall are not supplied. Use the appropriate screws for the wall material and structure when mounting the Wall-Mount Bracket. Before installation If you intend to install a TV or monitor that is not specified on page 2, be sure to refer to the leaflet "Installing the Wall-Mount Bracket" supplied with your TV or monitor. Step 1: Checking the parts required for the installation 1 Prepare four or more M8 or equivalent screws (not supplied) and a screwdriver. Select screws suitable for the material of the wall. 2 Unpack the carton and check to see that all the following items are included. Plate Unit (1) Mounting Hook Unit (2) Hook (4) Screw (+B6 × L20) (2) Paper Template (1) Screw (+PSW5 × L16) (6) 5 (GB)
-
 1
1 -
 2
2 -
 3
3 -
 4
4 -
 5
5 -
 6
6 -
 7
7 -
 8
8 -
 9
9 -
 10
10 -
 11
11 -
12
-
13
-
14
-
15
-
16
-
17
-
18
-
19
-
20
-
21
-
22
-
23
-
24
-
25
-
26
-
27
-
28
-
29
-
30
-
31
-
32
-
33
-
34
-
35
-
36
-
37
-
38
-
39
-
40
-
41
-
42
-
43
-
44
-
45
-
46
-
47
-
48
-
49
-
50
-
51
-
52
-
53
-
54
-
55
-
56
-
57
-
58
-
59
-
60
-
61
-
62
-
63
-
64
-
65
-
66
-
67
-
68
-
69
-
70
-
71
-
72
-
73
-
74
-
75
-
76
-
77
-
78
-
79
-
80
-
81
-
82
-
83
-
84
-
85
-
86
-
87
-
88
-
89
-
90
-
91
-
92
-
93
-
94
-
95
-
96
-
97
-
98
-
99
-
100
-
101
-
102
-
103
-
104
-
105
-
106
-
107
-
108
-
109
-
110
-
111
-
112
 |
 |