Sony KDL-52XBR10 Operating Instructions - Page 26
Unit Controls and Indicators - led
 |
UPC - 027242765832
View all Sony KDL-52XBR10 manuals
Add to My Manuals
Save this manual to your list of manuals |
Page 26 highlights
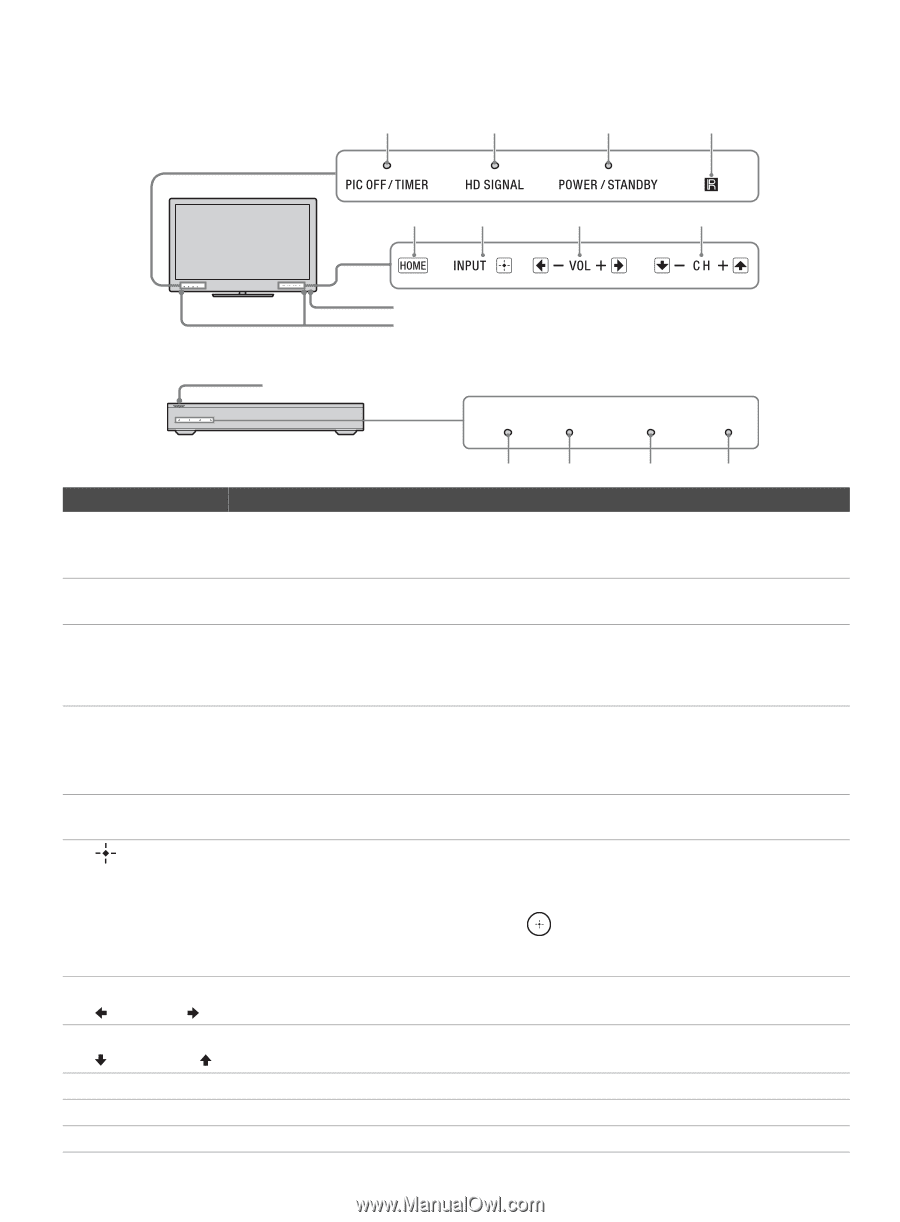
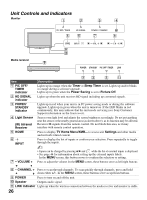
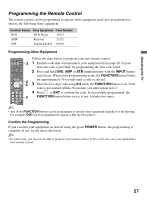
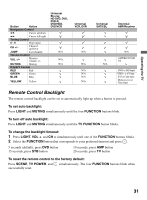
Unit Controls and Indicators Monitor 1 2 3 4 56 7 8 Media receiver 9 9 q; POWER STANDBY PIC OFF / TIMER LINK Item 1 PIC OFF/ TIMER indicator 2 HD SIGNAL indicator 3 POWER/ STANDBY indicator 4 Light Sensor (IR) Infrared Receiver 5 HOME 6 INPUT 7 - VOLUME + 33 1 qa Description Lights up in orange when the Timer or Sleep Timer is set. Lights up and/or blinks in orange during a software upgrade. Lights up in green when the Power Saving is set to Picture Off. Lights up when the unit receives HD signal including up converted signals. Lights up in red when your unit is in PC power saving mode or during the software upgrade. Lights up in green when the unit is turned on. If the LED blinks in red continuously, this may indicate that the unit needs servicing (see Sony Customer Support information on the front cover). Senses room light level and adjusts the screen brightness accordingly. Do not put anything near the sensor or the nearby general area (as shown above), as its function may be affected. Receives IR signals from the remote control. Do not block this area, as it may interfere with remote control operation. Press to display TV Home Menu/XMB™ to access unit Settings and other media and network related content. Press to display the list of inputs or confirm your selection. Press repeatedly to toggle through the inputs. ~ • Inputs can be changed by pressing V/v and while the list of external inputs is displayed. • See page 44 for information about setting up the external inputs labels. In the MENU screen, this button serves to confirm the selection or setting. Press to adjust the volume. In the MENU screen, these buttons serve as left/right buttons. 8 - CHANNEL + Press to scan through channels. To scan quickly through channels, press and hold down either +/-. In the MENU screen, these buttons serve as up/down buttons. 9 POWER Press to turn on and off the unit. 0 Speaker Outputs audio signal. qa LINK indicator Lights up when the wireless connection between the media receiver and monitor is stable. 26
-
 1
1 -
2
-
3
-
4
-
5
-
6
-
7
-
8
-
9
-
10
-
11
-
12
-
13
-
14
-
15
-
16
-
17
-
18
-
19
-
20
-
 21
21 -
 22
22 -
 23
23 -
 24
24 -
 25
25 -
 26
26 -
 27
27 -
 28
28 -
 29
29 -
 30
30 -
 31
31 -
32
-
33
-
34
-
35
-
36
-
37
-
38
-
39
-
40
-
41
-
42
-
43
-
44
-
45
-
46
-
47
-
48
-
49
-
50
-
51
-
52
-
53
-
54
-
55
-
56
 |
 |