Sony KDL-52XBR10 Operating Instructions - Page 8
Using a Wall-Mount Bracket - weight
 |
UPC - 027242765832
View all Sony KDL-52XBR10 manuals
Add to My Manuals
Save this manual to your list of manuals |
Page 8 highlights
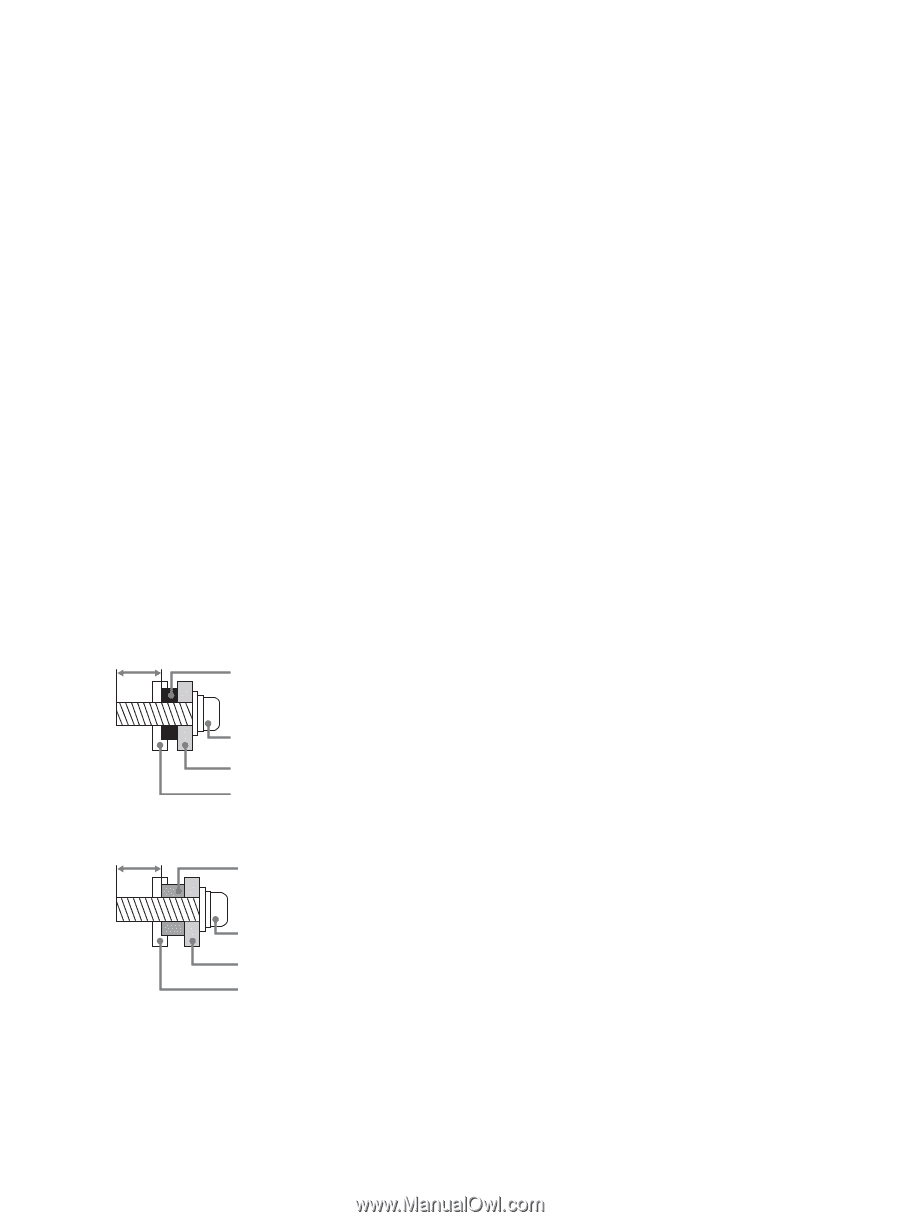
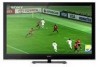
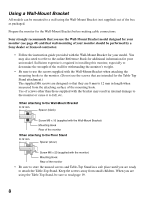
Using a Wall-Mount Bracket All models can be mounted to a wall using the Wall-Mount Bracket (not supplied) out of the box as packaged. Prepare the monitor for the Wall-Mount Bracket before making cable connections. Sony strongly recommends that you use the Wall-Mount Bracket model designed for your monitor (see page 49) and that wall-mounting of your monitor should be performed by a Sony dealer or licensed contractor. • Follow the instruction guide provided with the Wall-Mount Bracket for your model. You may also need to refer to the online Reference Book for additional information for your unit model. Sufficient expertise is required in installing this monitor, especially to determine the strength of the wall for withstanding the monitor's weight. • Be sure to use the screws supplied with the Wall-Mount Bracket when attaching the mounting hooks to the monitor. (Do not use the screws that are intended for the Table-Top Stand attachment.) The supplied M6 screws are designed so that they are 8 mm to 12 mm in length when measured from the attaching surface of the mounting hook. Use of screws other than those supplied with the bracket may result in internal damage to the monitor or cause it to fall, etc. When attaching to the Wall-Mount Bracket 8-12 mm Spacer (black) Screw M6 × 16 (supplied with the Wall-Mount Bracket) Mounting Hook Rear of the monitor When attaching to the Floor Stand 8-12 mm Spacer (silver) Screw M6 × 20 (supplied with the monitor) Mounting Hook Rear of the monitor • Be sure to store the unused screws and Table-Top Stand in a safe place until you are ready to attach the Table-Top Stand. Keep the screws away from small children. When you are using the Table-Top Stand, be sure to read page 19. 8
-
 1
1 -
2
-
 3
3 -
 4
4 -
 5
5 -
 6
6 -
 7
7 -
 8
8 -
 9
9 -
 10
10 -
 11
11 -
 12
12 -
 13
13 -
14
-
15
-
16
-
17
-
18
-
19
-
20
-
21
-
22
-
23
-
24
-
25
-
26
-
27
-
28
-
29
-
30
-
31
-
32
-
33
-
34
-
35
-
36
-
37
-
38
-
39
-
40
-
41
-
42
-
43
-
44
-
45
-
46
-
47
-
48
-
49
-
50
-
51
-
52
-
53
-
54
-
55
-
56
 |
 |