Sony KLV-23HR2 Operating Instructions - Page 32
Setting the Video Inputs
 |
View all Sony KLV-23HR2 manuals
Add to My Manuals
Save this manual to your list of manuals |
Page 32 highlights
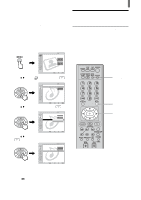
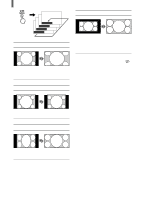
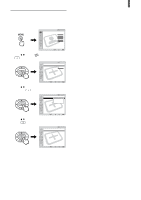
Watching the TV Setting the Video Inputs You can enjoy images (and sound) from optional video equipment connected to this unit by selecting the appropriate input. For details on connection, see pages 8 through 20. 0-9 and ENT (enter) buttons 1 CH +/- 1 Press TV/VIDEO repeatedly until the desired video input appears. Each time you press TV/VIDEO, the input changes as follows: Select • TV • VIDEO 1 IN • VIDEO 2 IN • VIDEO 3 IN • VIDEO 4 IN Display indication TV T r Video 1* r Video 2* r Video 3** r Video 4** * "S Video 1" or "S Video 2" will appear instead if you use S VIDEO input and if "Auto YC" in the (Setup) menu is set to "On" (page 12). **The type of picture signal (480i, 480p, 720p, or 1080i) appears under "Video 3" or "Video 4." Tips • You can also select the inputs by using the TV/VIDEO button on the TV. • When you have preset a label for each video input using "Video Label" in the (Setup) menu, the label will be displayed (see page 33). 2 Operate the selected optional equipment. For details, see "Operating Video Equipment with Your TV Remote Control" on page 34, or refer to the instructions supplied with each equipment. To return to watch the TV Press the 0-9 and ENT (enter) buttons or CH +/-. or 32
-
 1
1 -
2
-
3
-
4
-
5
-
6
-
7
-
8
-
9
-
10
-
11
-
12
-
13
-
14
-
15
-
16
-
17
-
18
-
19
-
20
-
21
-
22
-
23
-
24
-
25
-
26
-
 27
27 -
 28
28 -
 29
29 -
 30
30 -
 31
31 -
 32
32 -
 33
33 -
 34
34 -
 35
35 -
 36
36 -
 37
37 -
38
-
39
-
40
-
41
-
42
-
43
-
44
-
45
-
46
-
47
-
48
-
49
-
50
-
51
-
52
-
53
-
54
-
55
-
56
-
57
-
58
-
59
-
60
-
61
-
62
-
63
-
64
-
65
-
66
-
67
-
68
-
69
-
70
-
71
-
72
-
73
-
74
-
75
-
76
-
77
-
78
-
79
-
80
-
81
-
82
-
83
-
84
 |
 |
