Sony KV-27FV300 Primary User Manual - Page 22
Connecting Two VCRs for Tape Editing
 |
View all Sony KV-27FV300 manuals
Add to My Manuals
Save this manual to your list of manuals |
Page 22 highlights
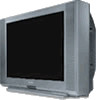
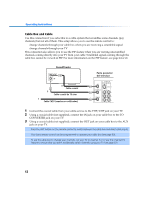
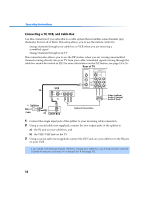
Connecting Your TV Optional connection If your VCR is equipped with video outputs, you can get better picture quality by connecting audio/video cables (not supplied) from AUDIO and VIDEO OUT on your VCR to AUDIO/ VIDEO IN on your TV. ✍ For better picture quality, use S VIDEO instead of the yellow audio/video cable. S VIDEO does not provide sound; you still must connect the audio cables. ✍ You can use the button to switch between the VHF/UHF and VIDEO inputs. Connecting Two VCRs for Tape Editing You can connect two VCRs together to edit video tapes. You can also connect both VCRs to your TV to view the program being recorded. Rear of TV 1 3 4 MONITOR AUDIO OUT (VAR/FIX) VCR (for playback) VCR (for recording) 1 Video (yellow) 2 Audio L (white) Audio R (red) 1 Using audio/video cables (not supplied), connect AUDIO and VIDEO OUT on your first VCR to AUDIO and VIDEO IN on your TV. 2 Using audio/video cables (not supplied), connect AUDIO and VIDEO IN on the second VCR to the MONITOR AUDIO and VIDEO OUT on your TV. ✍ To perform tape editing, set the TV to the video input intended for playback by pressing . 15
-
 1
1 -
2
-
3
-
4
-
5
-
6
-
7
-
8
-
9
-
10
-
11
-
12
-
13
-
14
-
15
-
16
-
 17
17 -
 18
18 -
 19
19 -
 20
20 -
 21
21 -
 22
22 -
 23
23 -
 24
24 -
 25
25 -
 26
26 -
 27
27 -
28
-
29
-
30
-
31
-
32
-
33
-
34
-
35
-
36
-
37
-
38
-
39
-
40
-
41
-
42
-
43
-
44
-
45
-
46
-
47
-
48
-
49
-
50
-
51
-
52
-
53
-
54
-
55
-
56
-
57
-
58
-
59
-
60
-
61
-
62
-
63
-
64
-
65
-
66
 |
 |