Sony MDS-JE470 Service Manual - Page 10
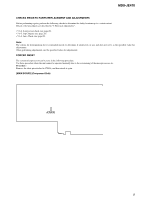
RETRY CAUSE DISPLAY MODE, Fig. 2 Reading the Test Mode Display, During playback - play levels
 |
View all Sony MDS-JE470 manuals
Add to My Manuals
Save this manual to your list of manuals |
Page 10 highlights
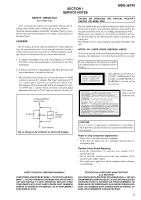
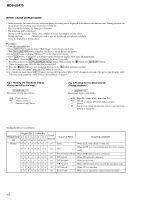
MDS-JE470 RETRY CAUSE DISPLAY MODE • In this test mode, the causes for retry of the unit during recording can be displayed on the fluorescent indicator tube. During playback, the "track mode" for obtaining track information will be set. This is useful for locating the faulty part of the unit. • The following will be displayed : During recording and stop : Retry cause, number of retries, and number of retry errors. During playback : Information such as type of disc played, part played, copyright. These are displayed in hexadecimal. Procedure: 1. Insert the recordable disc. 2. Press MENU/NO button to display "Edit Menu" on the fluorescent display. 3. Turn l AMS L button to display "All Erase?" on the fluorescent display. 4. Press YES button to display "All Erase??" on the fluorescent display. 5. Press YES button, "Complete!" is displayed on the fluorescent display and it turns off immediately. 6. Procedure 1: Press the x button continuously for about 10 seconds. Procedure 2: Press the LEVEL/DISPLAY/CHAR button while pressing the x button and MENU/NO button. 7. When the mode is set, "RTs 00c 00e 000" is displayed. 8. Press the z REC button to start recording. Then press the X button and start recording. 9. To check the "track mode", press the H button to start play. 10.To exit the test mode, press the @/1 button, and turn OFF the power. When "TOC" disappears, disconnect the power plug from the outlet. If the test mode cannot be exited, refer to "Forced Reset" on page 9. Fig. 1 Reading the Test Mode Display (During recording and stop) RTs@@c##c*** Fluorescent display tube display @@ : Cause of retry ## : Number of retries *** : Number of retry errors Fig. 2 Reading the Test Mode Display (During playback) @@###**$$ Fluorescent display tube display @@ : Parts No. (name of area named on TOC) ### : Cluster } Address (Physical address on disc) ** : Sector $$ : Track mode (Track information such as copyright infor- mation of each part) Reading the Retry Cause Display Higher Bits Lower Bits Hexadecimal 8 4 2 1 8 4 2 1 Hexa- Bit decimal b7 b6 b5 b4 b3 b2 b1 b0 Cause of Retry Occurring conditions Binary 0 0 0 0 0 0 0 1 01 shock When track jump (shock) is detected 0 0 0 0 0 0 1 0 02 ader5 When ADER was counted more than five times continuously 0 0 0 0 0 1 0 0 04 Discontinuous address When ADIP address is not continuous 0 0 0 0 1 0 0 0 08 DIN unlock When DIN unlock is detected 0 0 0 1 0 0 0 0 10 FCS incorrect When not in focus 0 0 1 0 0 0 0 0 20 IVR rec error When ABCD signal level exceeds the specified range 0 1 0 0 0 0 0 0 40 CLV unlock When CLV is unlocked 1 0 0 0 0 0 0 0 80 Access fault When access operation is not performed normally 10
-
 1
1 -
2
-
3
-
4
-
 5
5 -
 6
6 -
 7
7 -
 8
8 -
 9
9 -
 10
10 -
 11
11 -
 12
12 -
 13
13 -
 14
14 -
 15
15 -
16
-
17
-
18
-
19
-
20
-
21
-
22
-
23
-
24
-
25
-
26
-
27
-
28
-
29
-
30
-
31
-
32
-
33
-
34
-
35
-
36
-
37
-
38
-
39
-
40
-
41
-
42
-
43
-
44
-
45
-
46
-
47
-
48
-
49
-
50
-
51
-
52
-
53
-
54
-
55
-
56
-
57
-
58
-
59
-
60
-
61
-
62
-
63
-
64
-
65
-
66
-
67
-
68
-
69
-
70
 |
 |
