Sony MHC-ZX10 Operating Instructions - Page 5
Getting Started, To connect optional components, To deactivate/activate the, demonstration
 |
View all Sony MHC-ZX10 manuals
Add to My Manuals
Save this manual to your list of manuals |
Page 5 highlights
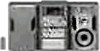
Getting Started 2 Connect the FM/AM antennas. Set up the AM loop antenna, then connect it. Jack type A Extend the FM lead antenna horizontally. AM loop antenna 3 Connect the power cord to a wall outlet. If the supplied adapter on the plug does not fit your wall outlet, detach it from the plug (only for models equipped with an adapter). To connect optional components See page 45. FM75 To deactivate/activate the demonstration AM When you set the time ("Step 2: Setting the time" on page 6), the demonstration is deactivated. To activate/deactivate the demonstration again, press DISPLAY repeatedly while the system is off. Jack type B Extend the FM lead antenna horizontally. AM loop antenna CFMOA75XIAL AM continued 5
-
 1
1 -
 2
2 -
 3
3 -
 4
4 -
 5
5 -
 6
6 -
 7
7 -
 8
8 -
 9
9 -
 10
10 -
 11
11 -
12
-
13
-
14
-
15
-
16
-
17
-
18
-
19
-
20
-
21
-
22
-
23
-
24
-
25
-
26
-
27
-
28
-
29
-
30
-
31
-
32
-
33
-
34
-
35
-
36
-
37
-
38
-
39
-
40
-
41
-
42
-
43
-
44
-
45
-
46
-
47
-
48
-
49
-
50
-
51
-
52
-
53
-
54
-
55
-
56
-
57
-
58
-
59
-
60
 |
 |

5
Getting Started
2
Connect the FM/AM antennas.
Set up the AM loop antenna, then
connect it.
Jack type
A
FM75
AM
Jack type
B
FM75
AM
COAXIAL
AM loop antenna
Extend the FM lead
antenna horizontally.
AM loop antenna
Extend the FM lead
antenna horizontally.
continued
3
Connect the power cord to a wall outlet.
If the supplied adapter on the plug does not
fit your wall outlet, detach it from the plug
(only for models equipped with an adapter).
To connect optional components
See page 45.
To deactivate/activate the
demonstration
When you set the time (“Step 2: Setting the time”
on page 6), the demonstration is deactivated.
To activate/deactivate the demonstration again,
press DISPLAY repeatedly while the system is
off.