Sony NWZA816P Service Manual - Page 8
Board, Holder, Connector
 |
UPC - 027242721456
View all Sony NWZA816P manuals
Add to My Manuals
Save this manual to your list of manuals |
Page 8 highlights
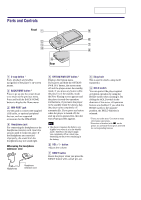
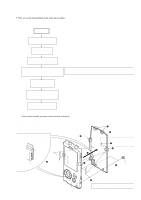
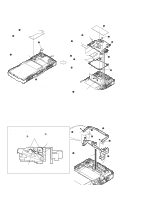
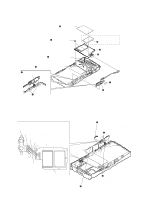
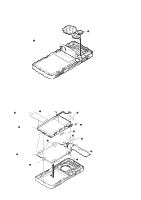
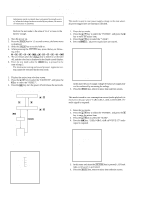
NW-A805/A806/A808/NWZ-A815/A816/A818 3-3. MAIN BOARD 1 cushion (connector) 2 sheet (harness) 4 battery assy connector (CN901) 9 insulating sheet (main) q; spacer (PWB) qa spacer (IC) 6 screw (M1.4) qg MAIN board 3 LCD flexible board (CN801) - rear view - 5 Unsolder three places of the HP flexible board, and turn it up without applying an excessive force. qf spacer (SRAM) qs Remove two solders. qd shield case (main) 8 connector (CN601) qs Remove two solders. 7 Turn up the LCD flexible board. - rear view - 3-4. HOLDER CONNECTOR NOTE WHEN INSTALLING THE SPRING (DOOR) Note: Hook the spring (door) on the part A of connector door assy and the part B of holder connector as shown in the figure. holder connector spring (door) A B 4 shaft 5 connector door assy 3 6 spring (door) 2 4 shaft 1 Lift up the holder connector. 7 holder connector connector door assy - side view - - rear view - 8
-
 1
1 -
2
-
 3
3 -
 4
4 -
 5
5 -
 6
6 -
 7
7 -
 8
8 -
 9
9 -
 10
10 -
 11
11 -
 12
12 -
 13
13 -
14
-
15
-
16
-
17
-
18
-
19
-
20
-
21
-
22
-
23
-
24
-
25
-
26
-
27
-
28
-
29
-
30
-
31
-
32
-
33
-
34
-
35
-
36
-
37
-
38
-
39
-
40
-
41
-
42
-
43
-
44
-
45
-
46
-
47
-
48
-
49
-
50
-
51
-
52
 |
 |
