Sony PCV-RX640 VAIO User Guide - Page 86
To Install an Additional Hard Disk Drive
 |
View all Sony PCV-RX640 manuals
Add to My Manuals
Save this manual to your list of manuals |
Page 86 highlights
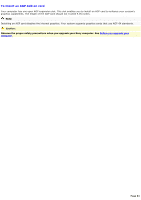
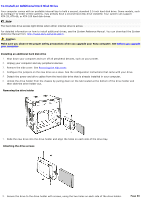
To Install an Additional Hard Disk Drive Your computer comes with an available internal bay to hold a second, standard 3.5-inch hard disk drive. Some models, such as Configure-to-Order (CTO) systems, may already have a second hard disk drive installed. Your system can support ATA-33, ATA-66, or ATA-100 hard disk drives. Note: The hard disk drive access light blinks when either internal drive is active. For detailed information on how to install additional drives, see the System Reference Manual. You can download the System Reference Manual from: http://www.sony.com/pcsupport. Caution: Make sure you observe the proper safety precautions when you upgrade your Sony computer. See Before you upgrade your computer. Installing an additional hard disk drive 1. Shut down your computer and turn off all peripheral devices, such as your printer. 2. Unplug your computer and any peripheral devices. 3. Remove the side cover. See Removing the side cover. 4. Configure the jumpers on the new drive as a slave. See the configuration instructions that came with your drive. 5. Detach the power and drive cables from the hard disk drive that is already installed in your computer. 6. Unlock the drive holder from the chassis by pulling down on the tab located at the bottom of the drive holder and then slide the drive holder out. Removing the drive holder 7. Slide the new drive into the drive holder and align the holes on each side of the drive bay. Attaching the drive screws 8. Secure the drive to the drive holder with screws, using the two holes on each side of the drive holder. Page 86
-
 1
1 -
2
-
3
-
4
-
5
-
6
-
7
-
8
-
9
-
10
-
11
-
12
-
13
-
14
-
15
-
16
-
17
-
18
-
19
-
20
-
21
-
22
-
23
-
24
-
25
-
26
-
27
-
28
-
29
-
30
-
31
-
32
-
33
-
34
-
35
-
36
-
37
-
38
-
39
-
40
-
41
-
42
-
43
-
44
-
45
-
46
-
47
-
48
-
49
-
50
-
51
-
52
-
53
-
54
-
55
-
56
-
57
-
58
-
59
-
60
-
61
-
62
-
63
-
64
-
65
-
66
-
67
-
68
-
69
-
70
-
71
-
72
-
73
-
74
-
75
-
76
-
77
-
78
-
79
-
80
-
 81
81 -
 82
82 -
 83
83 -
 84
84 -
 85
85 -
 86
86 -
 87
87 -
 88
88
 |
 |