Sony PDW700 User Manual (PDW-700 / PDW-F800 Operation Manual for Firmware Vers - Page 205
Recording shot data superimposed on the color bars, Setting the shot ID
 |
View all Sony PDW700 manuals
Add to My Manuals
Save this manual to your list of manuals |
Page 205 highlights
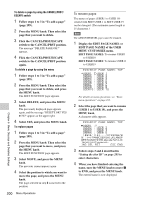
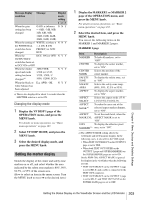
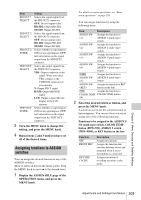
4 Repeat steps 2 and 3 until you have set all of the desired items. Recording shot data superimposed on the color bars In the SHOT DISP page of the USER menu, you can select which shot data is recorded superimposed on the color bars. You can also select which of the shot IDs (1 to 4) set in the SHOT DATA page is recorded superimposed on the picture. (How to select an item in the menu screen: Turn the MENU knob to move b to the desired item.) 1 Display the SHOT DISP page of the OPERATION menu, and press the MENU knob. For details on menu operations, see "Basic menu operations" on page 193. 2 Select the desired item, and press the MENU knob. You can set the following items on the SHOT DISP page. Item Description SHOT Selects whether or not the shot DATE data is superimposed (ON or OFF). SHOT Selects whether or not shot time TIME is superimposed (ON or OFF). SHOT Selects whether or not the model MODEL name is superimposed (ON or NAME OFF). SHOT Selects whether or not the serial SERIAL number is superimposed (ON or NO. OFF). SHOT ID Selects whether or not the shot SEL ID set on the SHOT ID page is superimposed. a) SHOT 16:9 Turns the following function on CHARA and off: When displaying aspect ratio 4:3 video, record superimposed "16:9" in the locations where 16:9 video is cut. SHOT Selects whether or not the BLINK blinking * is superimposed (ON CHARA or OFF). a) To carry out superimposed recording, select the SHOT ID number (1 to 4). Not to carry out superimposed recording, select "OFF". 3 Turn the MENU knob to select whether or not to record the selected item superimposed on the color bars or the SHOT ID number, and press the MENU knob. 4 Repeat steps 2 and 3 until you have set all of the desired items. To carry out superimposed recording To actually record the items selected for superimposed recording on the SHOT DISP page, set the OUTPUT/DCC switch to BARS, DCC OFF. The items selected for superimposed recording appear on the screen and are recorded superimposed on the color bars. Example display: when SHOT DATA is set to ON 08/03/15 Setting the shot ID You can set a shot ID of up to 12 alphanumeric characters, spaces, and symbols. When the OUTPUT/DCC switch is set to BARS, DCC OFF, this shot ID is output with the color bar signal. You can set four shot IDs (ID-1 to ID-4). Note When the menu is displayed, the shot ID is not displayed even if the color bar signal is output. (How to select an item in the menu screen: Turn the MENU knob to move b to the desired item.) 1 Display the SHOT ID page of the OPERATION menu, and press the MENU knob. Chapter 6 Menu Displays and Detailed Settings Setting the Status Display on the Viewfinder Screen and the LCD Monitor 205
-
 1
1 -
2
-
3
-
4
-
5
-
6
-
7
-
8
-
9
-
10
-
11
-
12
-
13
-
14
-
15
-
16
-
17
-
18
-
19
-
20
-
21
-
22
-
23
-
24
-
25
-
26
-
27
-
28
-
29
-
30
-
31
-
32
-
33
-
34
-
35
-
36
-
37
-
38
-
39
-
40
-
41
-
42
-
43
-
44
-
45
-
46
-
47
-
48
-
49
-
50
-
51
-
52
-
53
-
54
-
55
-
56
-
57
-
58
-
59
-
60
-
61
-
62
-
63
-
64
-
65
-
66
-
67
-
68
-
69
-
70
-
71
-
72
-
73
-
74
-
75
-
76
-
77
-
78
-
79
-
80
-
81
-
82
-
83
-
84
-
85
-
86
-
87
-
88
-
89
-
90
-
91
-
92
-
93
-
94
-
95
-
96
-
97
-
98
-
99
-
100
-
101
-
102
-
103
-
104
-
105
-
106
-
107
-
108
-
109
-
110
-
111
-
112
-
113
-
114
-
115
-
116
-
117
-
118
-
119
-
120
-
121
-
122
-
123
-
124
-
125
-
126
-
127
-
128
-
129
-
130
-
131
-
132
-
133
-
134
-
135
-
136
-
137
-
138
-
139
-
140
-
141
-
142
-
143
-
144
-
145
-
146
-
147
-
148
-
149
-
150
-
151
-
152
-
153
-
154
-
155
-
156
-
157
-
158
-
159
-
160
-
161
-
162
-
163
-
164
-
165
-
166
-
167
-
168
-
169
-
170
-
171
-
172
-
173
-
174
-
175
-
176
-
177
-
178
-
179
-
180
-
181
-
182
-
183
-
184
-
185
-
186
-
187
-
188
-
189
-
190
-
191
-
192
-
193
-
194
-
195
-
196
-
197
-
198
-
199
-
 200
200 -
 201
201 -
 202
202 -
 203
203 -
 204
204 -
 205
205 -
 206
206 -
 207
207 -
 208
208 -
 209
209 -
 210
210 -
211
-
212
-
213
-
214
-
215
-
216
-
217
-
218
-
219
-
220
-
221
-
222
-
223
-
224
-
225
-
226
-
227
-
228
-
229
-
230
-
231
-
232
-
233
-
234
-
235
-
236
-
237
-
238
-
239
-
240
-
241
-
242
-
243
-
244
-
245
-
246
-
247
-
248
-
249
-
250
-
251
-
252
-
253
-
254
-
255
-
256
-
257
-
258
-
259
-
260
-
261
-
262
-
263
-
264
-
265
-
266
-
267
-
268
-
269
-
270
-
271
-
272
-
273
-
274
-
275
-
276
-
277
 |
 |