Sony PDW700 User Manual (PDW-700 / PDW-F800 Operation Manual for Firmware Vers - Page 32
Status display on the viewfinder screen, Indicators
 |
View all Sony PDW700 manuals
Add to My Manuals
Save this manual to your list of manuals |
Page 32 highlights
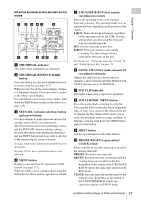
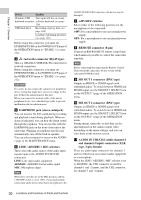
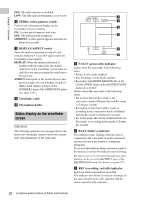
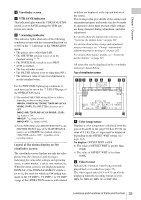
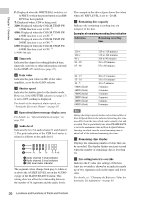
Chapter 1 Overview OFF: The tally indicator is disabled. LOW: The tally indicator brightness is set to low. l ZEBRA (zebra pattern) switch Controls the zebra pattern display on the viewfinder screen as follows. ON: A zebra pattern appears and stays. OFF: The zebra pattern disappears. MOMENT: A zebra pattern appears and stays for about five seconds. m DISPLAY/ASPECT switch Turns the marker indication on and off, and switches between 4:3 and 16:9 aspect ratios for viewfinder screen display. DISPLAY: When the marker indication is enabled with the camcorder, the marker indication on the viewfinder screen turns on and off every time you push the switch up to this position. ASPECT: Each push of the switch down to this position toggles the mask display on and off. (Make mask display settings on the MARKER 1 page of the OPERATION menu (see page 158).) n Viewfinder cable o Microphone holder Status display on the viewfinder screen Indicators The following indicators are arranged above and below the viewfinder screen to show the current state and adjustments of the camcorder. 1 TALLY/REC BATT 2 3 4 5 VTR SAVE 6 a TALLY (green tally) indicator Lights when the camcorder is the following states. • Picture Cache mode enabled • Disc Exchange Cache mode enabled • Recording with HDSDI REMOTE I/F on the CAM CONFIG 1 page of the MAINTENANCE menu set to G-TLY Flashes when the camcorder is the following states. • Set to Auto Interval Rec mode or the consecutive mode of Manual Interval Rec mode (1 flash per second) • Recording in Auto Interval Rec mode or recording in the consecutive mode of Manual Interval Rec mode (4 flashes per second) • Set to the single-shot mode of Manual Interval Rec mode, or recording in that mode (2 flashes per second) b BATT (battery) indicator This indicator starts flashing when the battery connected to the camcorder is nearly exhausted, and stays lit when the battery is completely exhausted. To prevent interruption during operation, replace the battery as soon as this indicator starts flashing. The battery power level at which the indicator starts flashing can be set on the BATTERY 1 page of the MAINTENANCE menu. For details, see page 175. c REC (recording, red tally) indicator Lights up while camcorder is recording. This indicator also flashes to indicate warnings, in the same manner as the tally indicator and the camera operator tally indicator. 32 Locations and Functions of Parts and Controls
-
 1
1 -
2
-
3
-
4
-
5
-
6
-
7
-
8
-
9
-
10
-
11
-
12
-
13
-
14
-
15
-
16
-
17
-
18
-
19
-
20
-
21
-
22
-
23
-
24
-
25
-
26
-
 27
27 -
 28
28 -
 29
29 -
 30
30 -
 31
31 -
 32
32 -
 33
33 -
 34
34 -
 35
35 -
 36
36 -
 37
37 -
38
-
39
-
40
-
41
-
42
-
43
-
44
-
45
-
46
-
47
-
48
-
49
-
50
-
51
-
52
-
53
-
54
-
55
-
56
-
57
-
58
-
59
-
60
-
61
-
62
-
63
-
64
-
65
-
66
-
67
-
68
-
69
-
70
-
71
-
72
-
73
-
74
-
75
-
76
-
77
-
78
-
79
-
80
-
81
-
82
-
83
-
84
-
85
-
86
-
87
-
88
-
89
-
90
-
91
-
92
-
93
-
94
-
95
-
96
-
97
-
98
-
99
-
100
-
101
-
102
-
103
-
104
-
105
-
106
-
107
-
108
-
109
-
110
-
111
-
112
-
113
-
114
-
115
-
116
-
117
-
118
-
119
-
120
-
121
-
122
-
123
-
124
-
125
-
126
-
127
-
128
-
129
-
130
-
131
-
132
-
133
-
134
-
135
-
136
-
137
-
138
-
139
-
140
-
141
-
142
-
143
-
144
-
145
-
146
-
147
-
148
-
149
-
150
-
151
-
152
-
153
-
154
-
155
-
156
-
157
-
158
-
159
-
160
-
161
-
162
-
163
-
164
-
165
-
166
-
167
-
168
-
169
-
170
-
171
-
172
-
173
-
174
-
175
-
176
-
177
-
178
-
179
-
180
-
181
-
182
-
183
-
184
-
185
-
186
-
187
-
188
-
189
-
190
-
191
-
192
-
193
-
194
-
195
-
196
-
197
-
198
-
199
-
200
-
201
-
202
-
203
-
204
-
205
-
206
-
207
-
208
-
209
-
210
-
211
-
212
-
213
-
214
-
215
-
216
-
217
-
218
-
219
-
220
-
221
-
222
-
223
-
224
-
225
-
226
-
227
-
228
-
229
-
230
-
231
-
232
-
233
-
234
-
235
-
236
-
237
-
238
-
239
-
240
-
241
-
242
-
243
-
244
-
245
-
246
-
247
-
248
-
249
-
250
-
251
-
252
-
253
-
254
-
255
-
256
-
257
-
258
-
259
-
260
-
261
-
262
-
263
-
264
-
265
-
266
-
267
-
268
-
269
-
270
-
271
-
272
-
273
-
274
-
275
-
276
-
277
 |
 |
