Sony RDR-HX715 Operating Instructions - Page 54
Creating s in a title, Adjust the setting using, press ENTER.
 |
View all Sony RDR-HX715 manuals
Add to My Manuals
Save this manual to your list of manuals |
Page 54 highlights
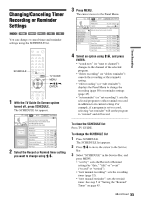
"HDD Rec. Picture Size"/"DVD Rec. Picture Size": Sets the picture size of the program to be recorded. • 4:3 (default): Sets the picture size to 4:3. • 16:9: Sets the picture size to 16:9 (wide mode). • Auto (HDD only): Automatically selects the actual picture size. "DVD Rec. Picture Size" works with DVDRs and DVD-RWs (Video mode) when the recording mode is set to HQ, HSP, SP or LSP. For all other recording modes, the screen size is fixed at "4:3." For DVD-RWs (VR mode), the actual picture size is recorded regardless of the setting. For example, if a 16:9 size picture is received, the disc records the picture as 16:9 even if "DVD Rec. Picture Size" is set to "4:3." For DVD+RWs/DVD+Rs, the screen size is fixed at "4:3." "Rec NR" (noise reduction): Reduces noise contained in the video signal. Creating chapters in a title The recorder can automatically divide a recording (a title) into chapters by inserting chapter marks during recording. To disable this function, set "Auto Chapter" in "Features" setup to "Off" (page 96). When recording on the HDD or a DVD-RW (VR mode) The recorder detects changes in the picture and sound and automatically inserts chapter marks. You can also insert and erase chapter marks manually (page 76). When recording on other recordable discs Chapter marks are inserted at approximately 6 minute intervals during recording. b Note When dubbing (page 79), the chapter marks in the dubbing source are not retained in the dubbed title. "Rec Video Equalizer": Adjusts the picture in greater detail. Press M/m to select the item you want to adjust, then press ENTER. • Contrast: Changes the contrast. • Brightness: Changes the overall brightness. • Color: Makes the colors deeper or lighter. • Hue: Changes the color balance. 3 Adjust the setting using
-
 1
1 -
2
-
3
-
4
-
5
-
6
-
7
-
8
-
9
-
10
-
11
-
12
-
13
-
14
-
15
-
16
-
17
-
18
-
19
-
20
-
21
-
22
-
23
-
24
-
25
-
26
-
27
-
28
-
29
-
30
-
31
-
32
-
33
-
34
-
35
-
36
-
37
-
38
-
39
-
40
-
41
-
42
-
43
-
44
-
45
-
46
-
47
-
48
-
 49
49 -
 50
50 -
 51
51 -
 52
52 -
 53
53 -
 54
54 -
 55
55 -
 56
56 -
 57
57 -
 58
58 -
 59
59 -
60
-
61
-
62
-
63
-
64
-
65
-
66
-
67
-
68
-
69
-
70
-
71
-
72
-
73
-
74
-
75
-
76
-
77
-
78
-
79
-
80
-
81
-
82
-
83
-
84
-
85
-
86
-
87
-
88
-
89
-
90
-
91
-
92
-
93
-
94
-
95
-
96
-
97
-
98
-
99
-
100
-
101
-
102
-
103
-
104
-
105
-
106
-
107
-
108
-
109
-
110
-
111
-
112
-
113
-
114
-
115
-
116
-
117
-
118
-
119
-
120
-
121
-
122
-
123
-
124
 |
 |
