Sony RDR-HX715 Operating Instructions - Page 57
Recording from connected equipment without a timer - reset
 |
View all Sony RDR-HX715 manuals
Add to My Manuals
Save this manual to your list of manuals |
Page 57 highlights
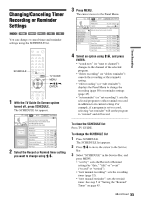
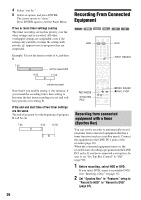
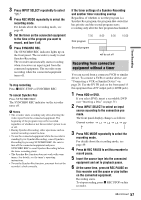
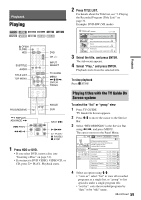
Timer Recording 3 Press INPUT SELECT repeatedly to select "L1." 4 Press REC MODE repeatedly to select the recording mode. For details about the recording mode, see page 49. 5 Set the timer on the connected equipment to the time of the program you want to record, and turn it off. 6 Press SYNCHRO REC. The SYNCHRO REC indicator lights up on the front panel. The recorder is ready to start Synchro-Recording. The recorder automatically starts recording when it receives an input signal from the connected equipment. The recorder stops recording when the connected equipment turns off. To stop recording Press x REC STOP or SYNCHRO REC. To cancel Synchro Rec Press SYNCHRO REC. The SYNCHRO REC indicator on the recorder turns off. b Notes • The recorder starts recording only after detecting the video signal from the connected equipment. The beginning of the program may not be recorded regardless of whether or not the recorder's power is on or off. • During Synchro-Recording, other operations such as normal recording cannot be done. • To use the connected equipment while the recorder is standing by for Synchro-Recording, cancel SynchroRecording by pressing SYNCHRO REC. Be sure to turn off the connected equipment and press SYNCHRO REC to reset Synchro-Recording before the timer recording starts. • The Synchro Rec function does not work with some tuners. For details, see the tuner's operating instructions. • To use the Synchro Rec function, you must first set the recorder's clock correctly. If the timer settings of a Synchro-Recording and another timer recording overlap Regardless of whether or not the program is a Synchro Rec program, the program that starts first has priority and the second program starts recording only after the first program has finished. 7:00 First program Second program 8:00 9:00 will be cut off 10:00 Recording from connected equipment without a timer You can record from a connected VCR or similar device. To connect a VCR or similar device, see "Connecting a VCR or Similar Device" on page 28. Use the DV IN jack on the front panel if the equipment has a DV output jack (i.LINK jack). 1 Press HDD or DVD. If you select DVD, insert a recordable DVD (see "Inserting a Disc" on page 31). 2 Press INPUT SELECT to select an input source according to the connection you made. The front panel display changes as follows: Channel number L1 L2 L3 DV 3 Press REC MODE repeatedly to select the recording mode. For details about the recording mode, see page 49. 4 Press X REC PAUSE to set this recorder to record pause. 5 Insert the source tape into the connected equipment and set to playback pause. 6 At the same time, press X REC PAUSE on this recorder and the pause or play button on the connected equipment. Recording starts. To stop recording, press x REC STOP on this recorder. ,continued 57
-
 1
1 -
2
-
3
-
4
-
5
-
6
-
7
-
8
-
9
-
10
-
11
-
12
-
13
-
14
-
15
-
16
-
17
-
18
-
19
-
20
-
21
-
22
-
23
-
24
-
25
-
26
-
27
-
28
-
29
-
30
-
31
-
32
-
33
-
34
-
35
-
36
-
37
-
38
-
39
-
40
-
41
-
42
-
43
-
44
-
45
-
46
-
47
-
48
-
49
-
50
-
51
-
 52
52 -
 53
53 -
 54
54 -
 55
55 -
 56
56 -
 57
57 -
 58
58 -
 59
59 -
 60
60 -
 61
61 -
 62
62 -
63
-
64
-
65
-
66
-
67
-
68
-
69
-
70
-
71
-
72
-
73
-
74
-
75
-
76
-
77
-
78
-
79
-
80
-
81
-
82
-
83
-
84
-
85
-
86
-
87
-
88
-
89
-
90
-
91
-
92
-
93
-
94
-
95
-
96
-
97
-
98
-
99
-
100
-
101
-
102
-
103
-
104
-
105
-
106
-
107
-
108
-
109
-
110
-
111
-
112
-
113
-
114
-
115
-
116
-
117
-
118
-
119
-
120
-
121
-
122
-
123
-
124
 |
 |
