Sony STR-AV500 Operating Instructions - Page 24
Video, Editing
 |
View all Sony STR-AV500 manuals
Add to My Manuals
Save this manual to your list of manuals |
Page 24 highlights
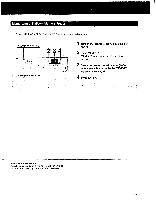
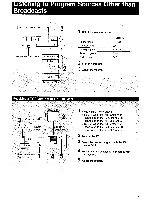
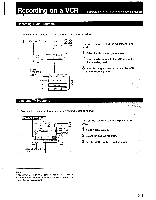
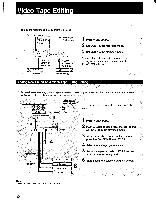
Video Tape Editing Turn on the receiver and the equipment to be used. SYSTEM POWER-ON Select SPEAKERS 1 A or B. Video signals Audio signals VIDEO 2 VIDEO IN/ AUDIO IN VCR 2 (for playack) VIDEO 1 VIDEO OUT/ AUDIO OUT VCR 1 (for recording) 1 Press VIDEO 2/CDV. 2 Set VCR 1 in the recording mode. 3 Set VCR 2 in the playback mode. You can listen to an audio program source during video tape editing by pressing the FUNCTION selector. Adding New Sound on a Video Tape During Editing During video tape editing, you can replace the sound previously recorded on a video tape with sound from another audio source, thus making your own personalized video tape. SYSTEM POWER-O 2,3 VCR 2 Select SPEAKERS A or S. L Video Signals Audio signals VCR 1 1 4 Monitor TV Turntable system CD player Tape deck DAT deck Turn on the receiver and the equipment to be used. 1 Press VIDEO 2/CDV. 2 Insert a recorded video tape into VCR 2 and set the VCR in the playback mode. 3 At the point where audio dubbing is to start, press the PAUSE button on VCR 2. 4 Select the audio program source. 5 Release the pause mode of VCR 2 and set VCR 1 in the recording mode. 6 Start playing the selected program source. Note You cannot edit a video tape from VCR 1 to VCR 2. 24
-
 1
1 -
2
-
3
-
4
-
5
-
6
-
7
-
8
-
9
-
10
-
11
-
12
-
13
-
14
-
15
-
16
-
17
-
18
-
 19
19 -
 20
20 -
 21
21 -
 22
22 -
 23
23 -
 24
24 -
 25
25 -
 26
26 -
 27
27 -
 28
28
 |
 |
