Sony STR-D511 Operating Instructions - Page 8
Identifying, Parts, Controls
 |
View all Sony STR-D511 manuals
Add to My Manuals
Save this manual to your list of manuals |
Page 8 highlights
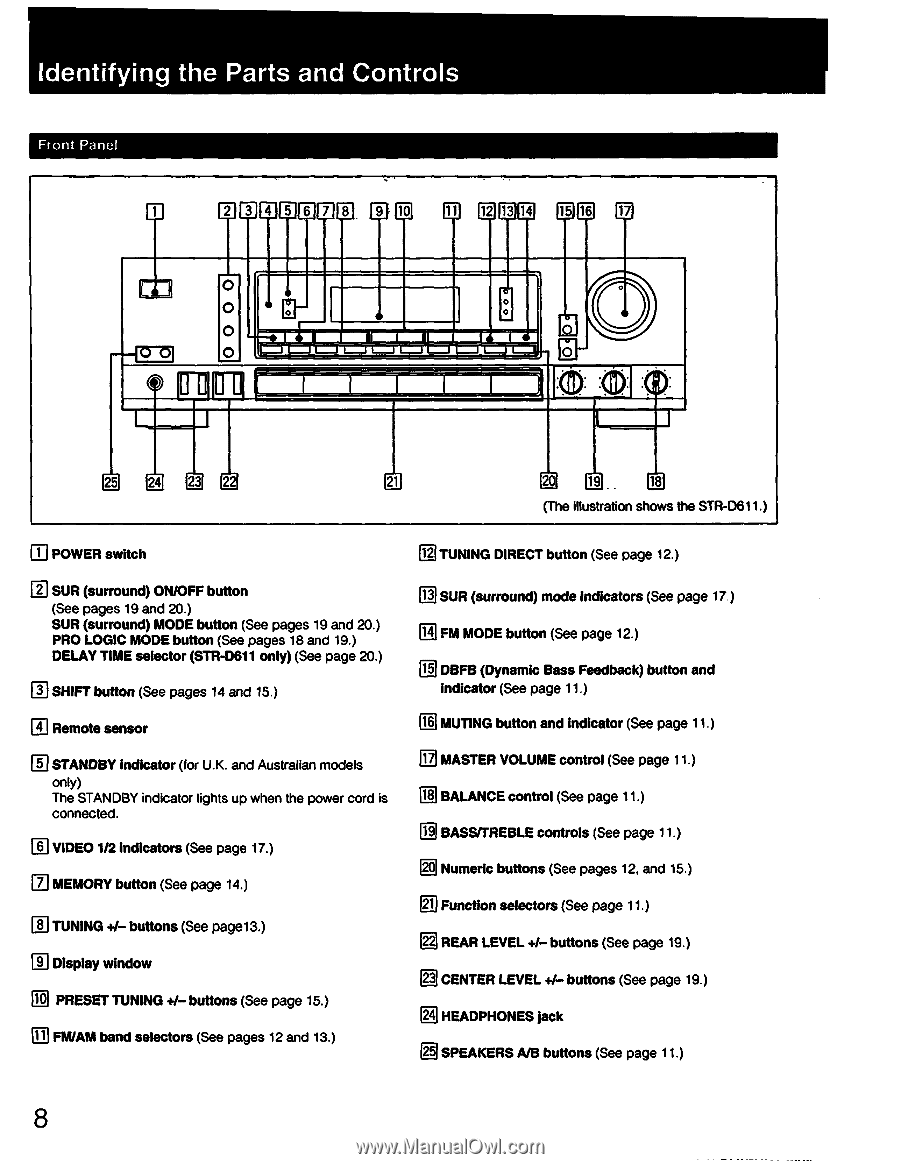
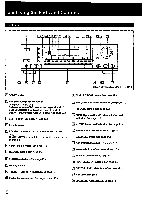
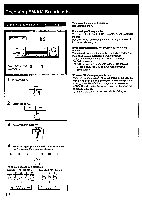
Identifying the Parts and Controls Front Panel EICEIDEEI MN 0 BC1E1 CIO CD O O -1O OI uu a ir IL I. I • L_-I L.-I L.-J L--I L_I L__1 1_-I L --I El E.. 18 (The illustration shows the STR-D611.) El POWER switch ElTUNING DIRECT button (See page 12.) SUR (surround) ON/OFF button (See pages 19 and 20.) SUR (surround) MODE button (See pages 19 and 20.) PRO LOGIC MODE button (See pages 18 and 19.) DELAY TIME selector (STR-D611 only) (See page 20.) M SHIFT button (See pages 14 and 15.) Remote sensor ID STANDBY indicator (for U.K. and Australian models only) The STANDBY indicator lights up when the power cord is connected. M VIDEO 1/2 indicators (See page 17.) L] MEMORY button (See page 14.) El TUNING +/- buttons (See pagel3.) El Display window M PRESET TUNING +1- buttons (See page 15.) n FM/AM band selectors (See pages 12 and 13.) 13 SUR (surround) mode indicators (See page 17.) 14 FM MODE button (See page 12.) 15 DBFB (Dynamic Bass Feedback) button and indicator (See page 11.) 16 MUTING button and indicator (See page 11.) nMASTER VOLUME control (See page 11.) 18 BALANCE control (See page 11.) B BASS/TREBLE controls (See page 11.) NNumeric buttons (See pages 12, and 15.) B Function selectors (See page 11.) p REAR LEVEL +/- buttons (See page 19.) 23 CENTER LEVEL +/- buttons (See page 19.) 24 HEADPHONES jack SPEAKERS NB buttons (See page 11.) 8
-
 1
1 -
2
-
 3
3 -
 4
4 -
 5
5 -
 6
6 -
 7
7 -
 8
8 -
 9
9 -
 10
10 -
 11
11 -
 12
12 -
 13
13 -
14
-
15
-
16
-
17
-
18
-
19
-
20
-
21
-
22
-
23
-
24
 |
 |