Sony STR-DE945 Operating Instructions - Page 23
Before You Use Your Receiver, player or tape deck.
 |
View all Sony STR-DE945 manuals
Add to My Manuals
Save this manual to your list of manuals |
Page 23 highlights
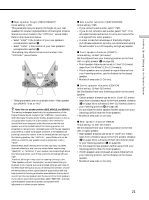
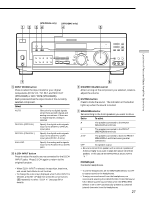
Hooking Up and Setting Up the Speaker System Notes • The front balance, rear balance, center level, and rear level are shown in the display during adjustment. • Although these adjustments can also be made via the front panel using the LEVEL menu (when the test tone is output, the receiver switches to the LEVEL menu automatically), we recommend you follow the procedure described above and adjust the speaker levels from your listening position using the remote control. Before You Use Your Receiver Before turning on the receiver Make sure that you have: • Turned MASTER VOLUME to the leftmost position (0). • Selected the appropriate front speakers (see "7 SPEAKERS selector" on page 27). Checking the connections After connecting all of your components to the receiver, do the following to verify that the connections were made correctly. 1/u Function buttons MASTER VOLUME SPEAKERS OFF A B A+B PHONES MULTI CHANNEL DECODING DIMMER DISPLAY INPUT MODE 5.1CH INPUT - VIDEO 1 VIDEO 2 VIDEO 3 DVD/LD TV/SAT CINEMA STUDIO EX. A B C LEVEL TAPE MD/DAT CD TUNER PHONO SOUND FIELD SUR A.F.D. 2CH MODE EQ EQUALIZER BASS BOOST MASTER VOLUME PRESET - TUNING + SHIFT - TUNING + MEMORY FM/AM FM MODE 2ND AUDIO + SET UP NAME ENTER 0 BASS MUTING EQUALIZER BOOST VIDEO 3 INPUT 10 VIDEO L AUDIO R 1 Press ?/1 to turn on the receiver. 2 Press a function button to select a component (program source) that you connected (e.g., CD player or tape deck). 3 Turn on the component and start playing it. 4 Rotate MASTER VOLUME to turn up the volume. If you do not obtain normal sound output after performing this procedure, look for the reason in the checklist on the following page and take the appropriate measures to correct the problem. 23
-
 1
1 -
2
-
3
-
4
-
5
-
6
-
7
-
8
-
9
-
10
-
11
-
12
-
13
-
14
-
15
-
16
-
17
-
 18
18 -
 19
19 -
 20
20 -
 21
21 -
 22
22 -
 23
23 -
 24
24 -
 25
25 -
 26
26 -
 27
27 -
 28
28 -
29
-
30
-
31
-
32
-
33
-
34
-
35
-
36
-
37
-
38
-
39
-
40
-
41
-
42
-
43
-
44
-
45
-
46
-
47
-
48
-
49
-
50
-
51
-
52
-
53
-
54
-
55
-
56
-
57
-
58
-
59
-
60
-
61
-
62
-
63
-
64
 |
 |