Sony UPDR200 Operating Instructions - Page 5
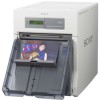
Ribbon door Paper door - ribbon tray
 |
View all Sony UPDR200 manuals
Add to My Manuals
Save this manual to your list of manuals |
Page 5 highlights
Introduction C Operation button door (page 19) Buttons to be used for menu operation are located under this door. Key panel section A EXEC button (page 20) Press this button to print the gray scale adjustment pattern. B MENU button (page 21) Press this button to carry out menu operations. Pressing the MENU button changes the printer to the off-line mode. C Cursor buttons (page 21) Press these buttons to select the item to be displayed on the LCD. D CAL (calibration) button (page 19) Press this button to adjust the gray balance. E PRINT STOP button (page 19) Pressing the PRINT STOP button for more than one second during printing results in cancelling the number of printings set and clearing the images stored in the memory. The printer stops printing when the page currently printing is completed and ejected. D Output tray (page 13) Collects printouts that are ejected. E Output stopper (page 13) Adjust the position according to the printing pack in use. There are four potions to which to adjust. F Output tray adapter (page 14) Attach this to the output tray to prevent printouts from falling out. G Output slot (page 18) Printouts are ejected from here. H Paper door (page 10) Open and close this when replacing paper rolls. This does not open while printing is in progress. I Ribbon door (page 12) Open and close this when replacing the ink ribbon. This does not open while printing is in progress. J Paper door lever Use this to open the paper door. When the paper and ribbon doors are open A Paper core Insert this into the paper roll. B Ribbon tray Place the ink ribbon here. C Paper adapter (blue) D Paper adapter (pink) Attach the paper adapters to the printer when using the 2UPC-R203/R205 series printing pack. 5 Location and Function of Parts and Controls
-
 1
1 -
 2
2 -
 3
3 -
 4
4 -
 5
5 -
 6
6 -
 7
7 -
 8
8 -
 9
9 -
 10
10 -
 11
11 -
12
-
13
-
14
-
15
-
16
-
17
-
18
-
19
-
20
-
21
-
22
-
23
-
24
-
25
-
26
-
27
-
28
-
29
-
30
-
31
 |
 |
